Installing Sametime 10 - The Proxy Server

The Sametime Proxy Server is needed if you have a Community server you want people to login to using either a web or mobile client, this includes having Sametime awareness for other products such as Verse or Connections. Since I had already installed a Community Server without using a System Console I now wanted to add a Sametime Proxy Server with as minimal additional software as possible.

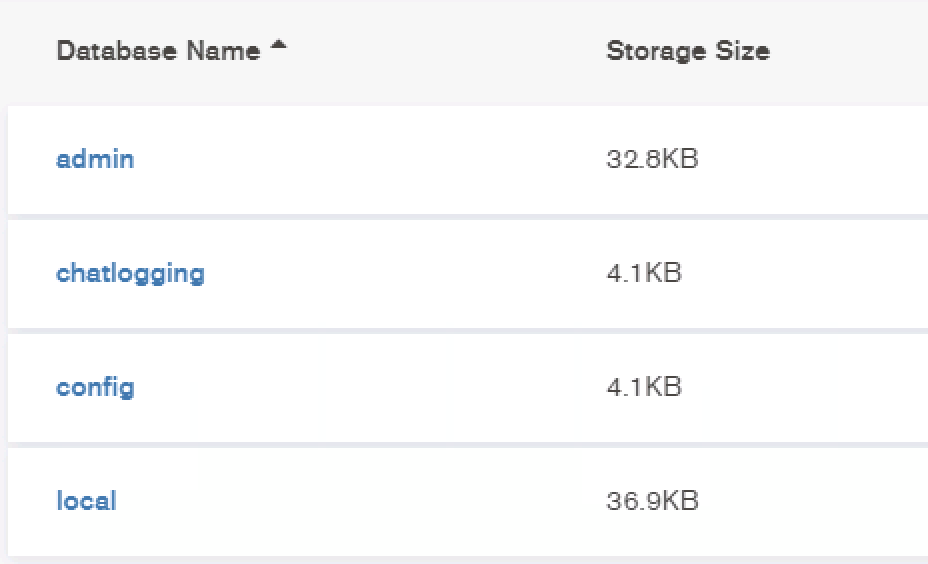
The Sametime Proxy server uses a DB2 database for iOS push notifications. If you don’t create that database the server will work in every other way but you won’t have working push notifications to iOS devices. You can create the database on any DB2 10.x or 11.x server but if you don’t have DB2 your Sametime license includes entitlement to a limited for Sametime only use license of DB2 10.5 (at least that’s what is in the download).

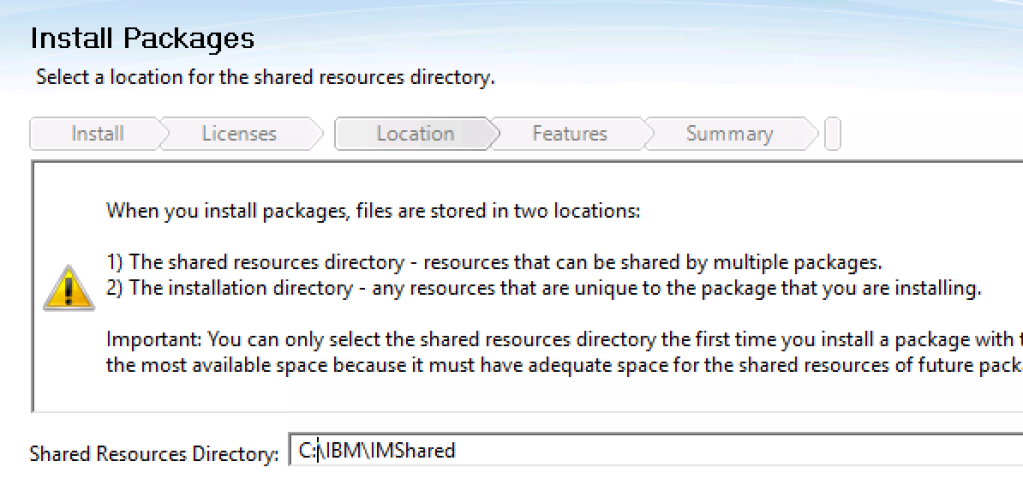
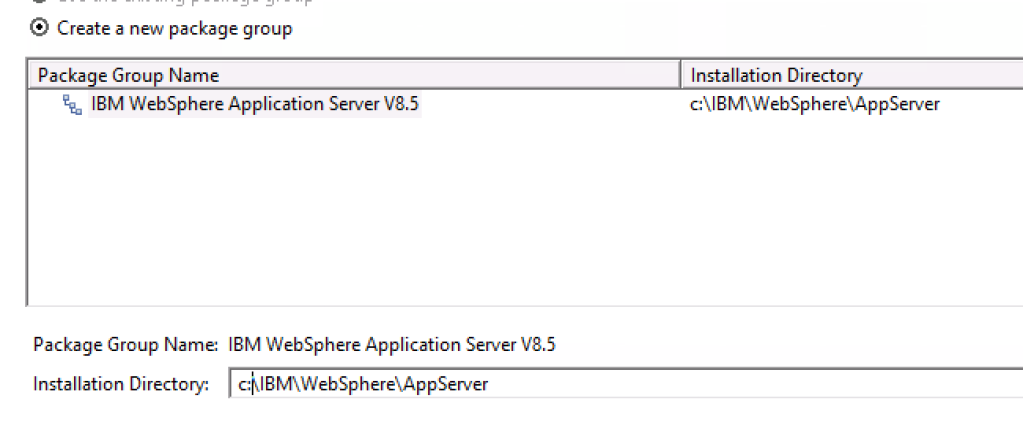
To start we need to install Installation Manager. Installation Manager is a package management software that will be used to install WebSphere and the Sametime Proxy Server on top of it. The Sametime download comes with version 1.6.2 but you are going to want to upgrade that to at least 1.8.6 before installing anything. Once Installation Manager is installed we need to install WebSphere 8.5.5 fixpack 14. Don’t worry about the fixpack download for now, if you have internet access during the install that can be done automatically so you will want to start by extracting each of the three WebSphere installers to a directory on your file system. It doesn’t matter which one. I extracted mine to C:\Software\WAS855. This is just the install directory so you don’t need to keep it once the install is complete.

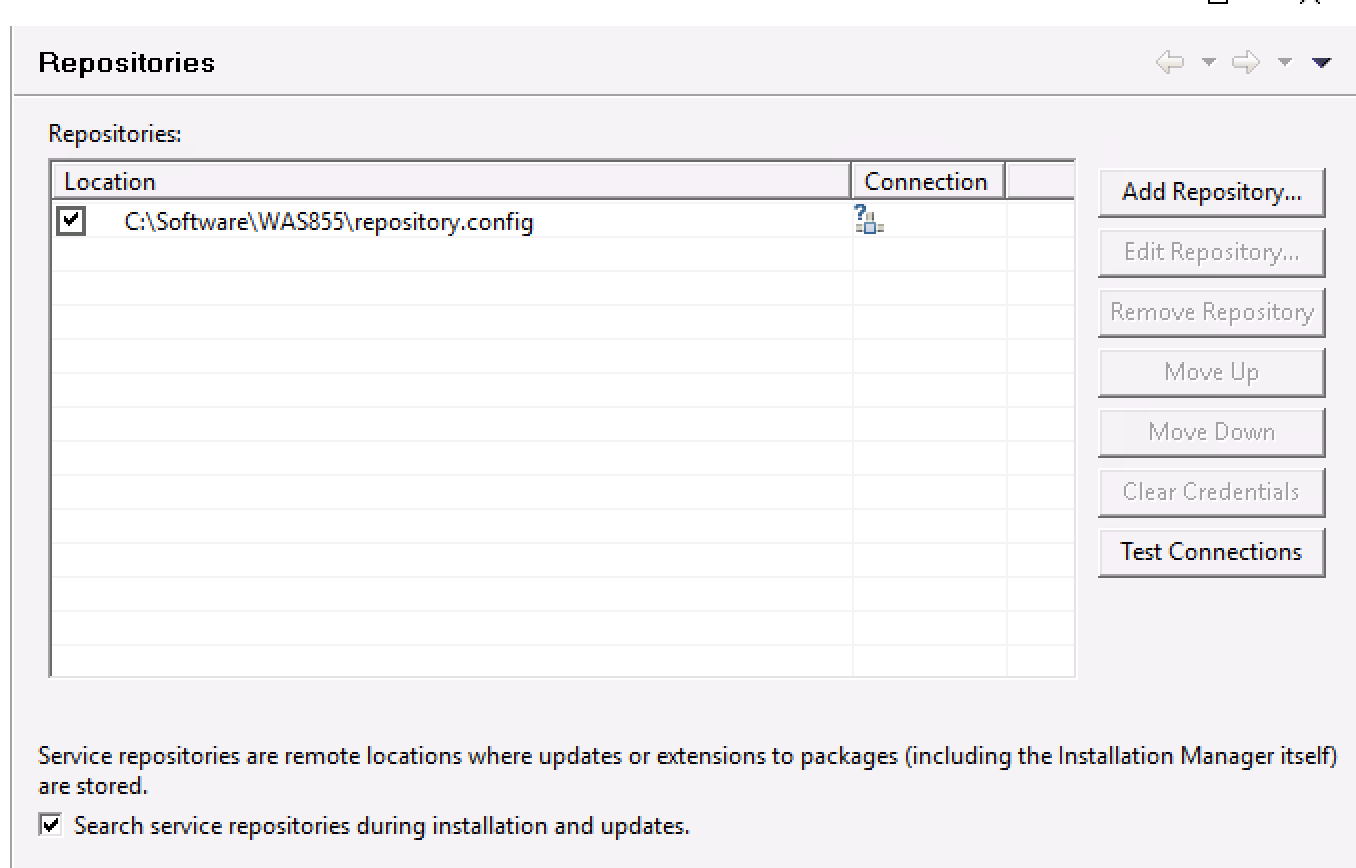
Now we need to add a repository under Installation Manager so it can find the installer for WebSphere. The installer file is always repository.config so I added a respository (File - Preferences) and pointed to c:\software\was855\repository.config

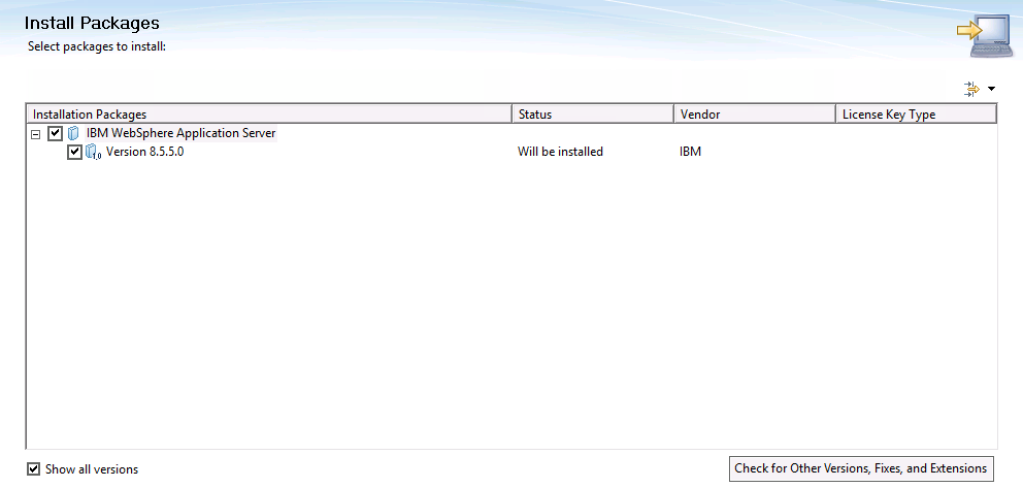
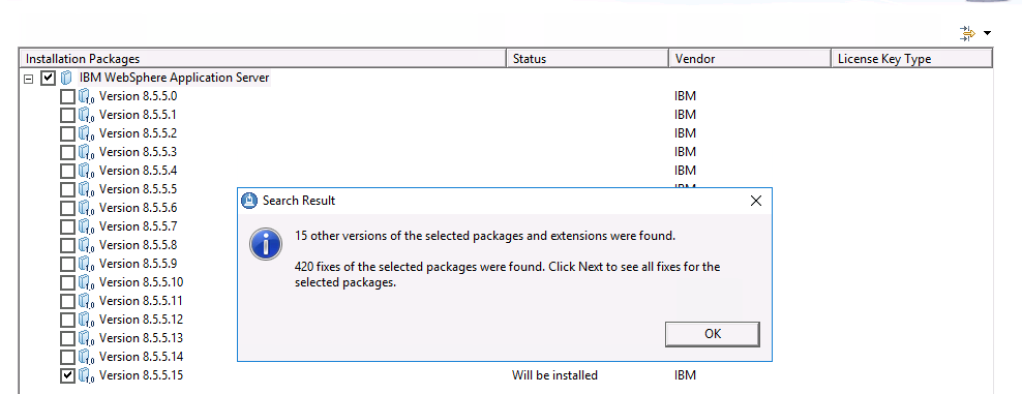
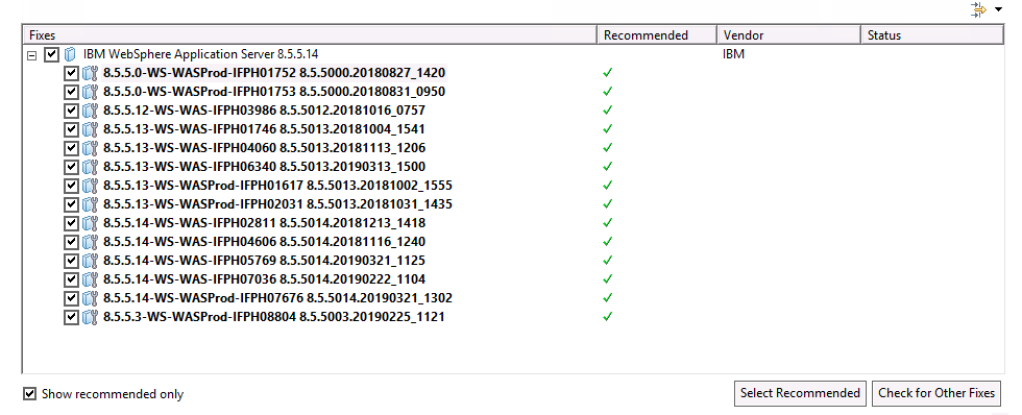
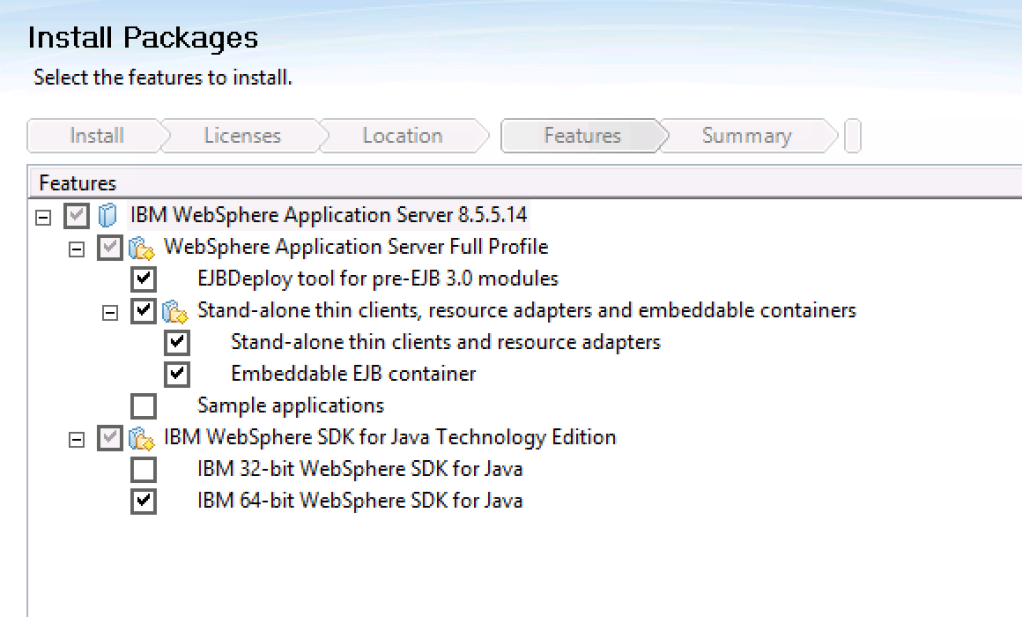
Once the repository is added I can choose “Install” from the main Installation Manager menu and I will be presented with the option to install WebSphere 8.5.5. As you can see it has automatically checked Version 8.5.5.0 and I have checked “Show all versions” so I can install Fixpack 14 directly during this one install step.

The installer finds 15 fixpacks and automatically selects the newest. Instead I uncheck that and choose 8.5.5.14 which is what we want for this install
We accept all the recommended fixes that are part of 8.5.5.14
The installer warns us that there is a missing required fix so we uncheck “show recommended only” and search for the missing fix “ph01621” and select that to install along with WebSphere 8.5.5.14
Choose the shared resource directory that Installation Manager will use. This can’t be changed later without uninstalling everything so make sure4 you have room
The WebSphere install directory wil lbe where the profiles and program files will be created. All WebSphere servers will be installed under this path
This is the confirmation of what we want to install
Once the WebSphere install is complete go ahead and close Installation Manager without creating a profile (choose “None”). The Sametime Proxy Server will create its own profile as a standalone node so you don’t need to manually create one here.

Now the WebSphere install is complete we can proceed to installing the Sametime Proxy Server. In my design it’s a standalone server so has no deployment manager or System Console. The instructions to do this require us to perform a silent install which means using a response file specifying the configuration that is accessed from outside the Installation Manager GUI.

The extracted installer for the Sametime Proxy Server contains a response file we can edit for our own install. My response file was in

C:\Software\SametimeProxyServer\responseFiles and was called ip.rsp.

I took a copy of that file and made my own changes - see the bottom of this blog for my ip.rsp file but one very important consideration is that in the sample ip.rsp the default password of “wasadmin” is set. If you run the install without changing that you will end up with a login of wasadmin and a password of wasadmin.

The lines in the rsp file that set this are

<data key=’user.com.ibm.lotus.sametime.proxyserver.was.adminid’ value=’wasadmin‘/>

<data key=’user.com.ibm.lotus.sametime.proxyserver.was.password’ value=’zN39fpCc9SqIryGJM7+02A==‘/>

zN39fpCc9SqIryGJM7+02A== is the encoded value of “wasadmin”, you must enter the encoded value of the password you want to set in the response file. To generate the encoded value before adding it to the response file you use the “generateEncodedPassword” utility which can be found in your Sametime Proxy Server extracted install e.g.

c:\Software\SametimeProxyServer\GenerateEncodedPassword\

From the IBM Installaton Manager install directory (C:\IBM\Installation Manager for me) I ran

C:\Software\SametimeProxyServer\GeneratedEncodedPassword\GenerateEncodedPassword.bat gabpass >pw.txt - which generates the encoded value for “gabpass” and writes it to the pw.txt text file as “rNFGfQ/sPi082+AaXFMNxA==. I write the value to a text file so I can have it recorded whilst I complete the next step.

I can then modify the value of <data key=’user.com.ibm.lotus.sametime.proxyserver.was.password’ value=’rNFGfQ/sPi082+AaXFMNxA==’/>

Important note; do not try and use special characters in your WebSphere passwords especially @ and !.

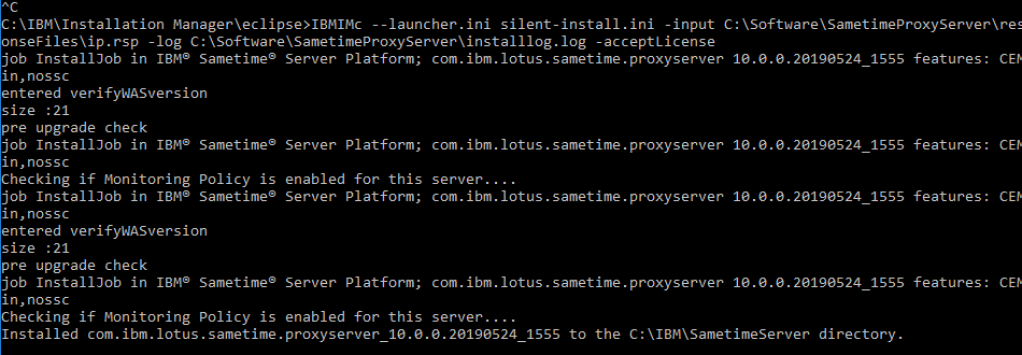
Now we are ready to run the silent install from the eclipse directory where Installation Manager is installed e.g c:\IBM\Installation Manager\eclipse using the command

IBMIMc -launcher.ini silent-install.ini -input response_file -log log_path_and_filename -acceptLicense

See output of my install running below

With the install completed successfully we can sign onto the node via https://hostname:9043/ibm/console using the credentials we set in our rsp install file and see the Sametime Proxy Server in place. The community server that the Sametime Proxy connects to was specified in my response file when I did the install.

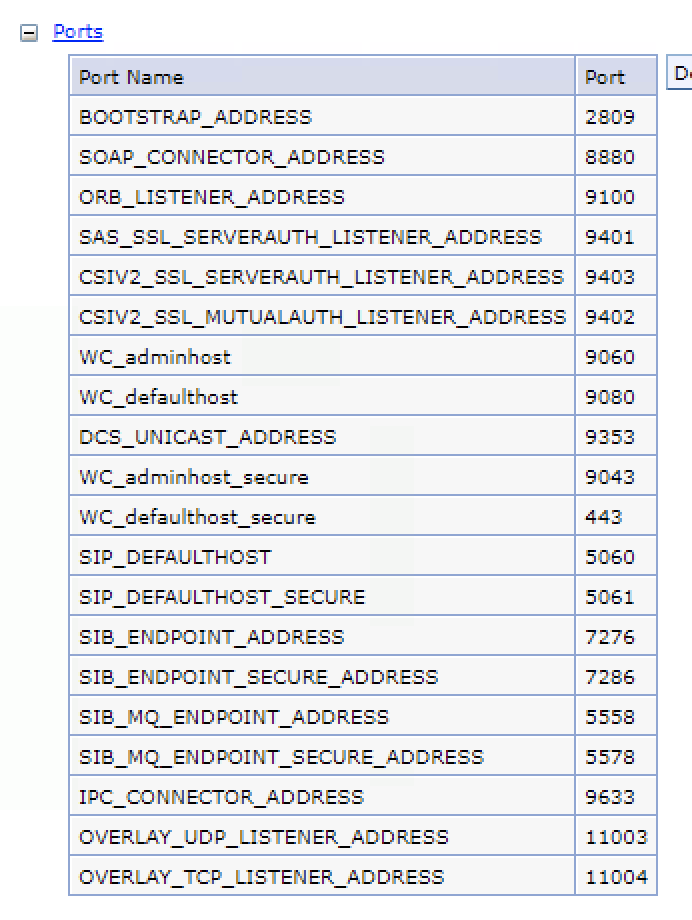
In my environment I wanted to have the Sametime Proxy Server on port 443 securely and to install my own SSL certificate. To modify the ports for the Samtime Proxy Server click on the server name and choose “ports” under “Communication” then edit the value for “wc_defaulthost_secure”.

Once this step is complete you should be able to connect to Sametime through a mobile client or through the web using the new web client on https://hostname:port/chat

Once the server is installed any changes to the configuration such as which Community server or cluster it should connect to should be changed by directly editing the stproxyconfig.xml file.

I could do that but then I hit a problem in that anyone accessing Sametime via the Proxy Server could send but not receive messages or see any they sent. My next blog “Issues With MongoDB During Sametime Install” explains what happened and how HCL helped me identify and fix it.

For the official install instructions from HCL please see this PDF

My ip.rsp file is shown below as an example. You will need to modify it for your own install.


<?xml version="1.0" encoding="UTF-8"?>


<!--The "acceptLicense" attribute has been deprecated. Use "-acceptLicense" command line option to accept license agreements.-->

<agent-input temporary='true' clean='true'  acceptLicense='false'>


<server>

<!-- When the repository location is specified as a relative path, the path is interpreted relative to the location of this response file -->

<repository id='IBM® Sametime® Server Platform'>

<!-- 

The files which are installed in the directory specified by the value of the

user.installlocation relate to WAS installer code.

If the specified directory exists prior to running the installer it must be empty.

Therefore, if you are installing upon an existing copy of WebSphere,

you will probably need to change it from the default value.

-->

<data key='user.installlocation' value='C:/IBM/SametimeServer'/>
<!-- This attribute specifies where WebSphere Application Server is already installed. -->

<data key='user.was.installlocation'value='C:/IBM/WebSphere/AppServer'/>

<!--

This location is the path we will install the offering to i.e. the files used for creating

Sametime WAS server profiles.

-->

<data key='user.com.ibm.lotus.sametime.proxyserver.offering.installlocation' value='C:/IBM/WebSphere/STPServerCell'/>

<!--

*** CHANGEME ***

The following two XML elements specify the host and port of the Sametime community server that

you wish to connect to with this Proxy server. You will need to alter it. The host name needs to be the FQDN of the CS
The default port to use is 1516, because this is the default port for Virtual Places 

server to server communication (1533 is the default for client to server communication_

-->

<data key='user.com.ibm.lotus.sametime.proxyserver.sthostname' value=‘stsite.turtlepartnership.com’/>

<data key='user.com.ibm.lotus.sametime.proxyserver.stport' value='1516'/>

<!--

This attribute defines the type of WAS profile(s) you wish to create.

This attribute is case-sensitive and Valid options are:  

'Cell' - (default) create a cell consisting of a Deployment manager and a managed node

'PN' - create a stand-alone primary node  federated to an existing SSC Deployment manager

'SN' - create a secondary node federated to an existing Deployment manager

-->

<data key='user.com.ibm.lotus.sametime.proxyserver.installtype' value='PN'/>
<!-- 

If you specified that you wish to install a WAS secondary node profile,

you must edit these attributes to match the host name and soap port of the Deployment manager you wish to have your WAS profile managed by
If this secondary node is a standalone node, then edit these attributes to match the secondary node's hostname and soap port values.

-->

<data key='user.com.ibm.lotus.sametime.proxyserver.dmhost' value='DMHost'/>

<data key="user.com.ibm.lotus.sametime.proxyserver.Dmgr.WASDMSoapPort" value="8603"/>

<data key="user.com.ibm.lotus.sametime.proxyserver.Dmgr.WASHost" value="DMHost"/>
<!--

Uncomment this attribute if you wish the WAS profile to use a hostname other than the default for this machine

if you do specify a hostname it should be the fully qualified domain name (e.g. "servername.domain.com" not "servername")
<data key='user.com.ibm.lotus.sametime.proxyserver.hostname' value='HOSTNAME'/>

-->

<!--

The WAS profiles created by the installer will be protected by File based security 

for the System Console. The following two XML elements specify the username & password

that can be used to login to the WAS System Console.It is not allowed to omit these elements.

For security reasons you do not store the password in plain text. Instead you can use

the generateEncodedPassword utility contained in the kit to generated an encoded form of the password

For example 'zN39fpCc9SqIryGJM7+02A==' is equivalent to a password of 'wasadmin'
It is not possible to choose LDAP security during install, but this can be

configured after install 

-->

<data key='user.com.ibm.lotus.sametime.proxyserver.was.adminid' value='wasadmin'/>

<data key='user.com.ibm.lotus.sametime.proxyserver.was.password' value='zN39fpCc9SqIryGJM7+02A=='/>

<!--

The default is to name the WAS cell <HOSTSHORTNAME>ProxyCell 

and to name the WAS node <HOSTSHORTNAME>ProxyNode

but you can over-ride the defaults by un-commenting the following parameters
<data key='user.com.ibm.lotus.sametime.proxyserver.cellname' value='HOSTNAMEProxyCell'/>

<data key='user.com.ibm.lotus.sametime.proxyserver.nodename' value='HOSTNAMEProxyNode'/>

-->
<!--

These are the names that will be assigned to the WAS profiles created by this installer

It is safe to simply use the default values or to change them to anything you want so long as the profile names are unique

 -->

<data key='user.com.ibm.lotus.sametime.proxyserver.was.serverprofile' value='STPAppProfile'/>

<data key='user.com.ibm.lotus.sametime.proxyserver.was.dmprofile' value='STPDMgrProfile'/>

<data key='user.com.ibm.lotus.sametime.proxyserver.was.snserverprofile' value='STPSNAppProfile'/>

<data key='user.com.ibm.lotus.sametime.proxyserver.was.appserver' value='STProxyServer'/>

<!--Port the Deployment Manager will run on. This should not be changed from the default of 8600 -->

<data key='user.com.ibm.lotus.sametime.proxyserver.was.dmport' value='8600'/>

<!--Port the Deployment Manager will use for SOAP connections (the default is 8603) -->

<data key='user.com.ibm.lotus.sametime.proxyserver.was.dm.soapport' value='8603'/>

<!--

This attribute specifies whether or not you wish to install from a SSC deployment plan

It is case-sensitive and the only valid values are TRUE and FALSE
If you change this to TRUE, you will also need to specify values for

user.com.ibm.lotus.sametime.proxyserver.SSChostname, user.com.ibm.lotus.sametime.proxyserver.SSCportnumber, 

user.com.ibm.lotus.sametime.proxyserver.SSCusername, user.com.ibm.lotus.sametime.proxyserver.SSCpassword and 

user.com.ibm.lotus.sametime.proxyserver.SSC_SSLEnabled

see the other sample response file for sample values for these parameters

-->

<data key='user.com.ibm.lotus.sametime.proxyserver.SSCEnabled' value='FALSE'/>
<!-- 

This attribute specified is we are doing an upgrade or a fresh install

It is case-sensitive and valid values are 'INSTALL' or 'UPDATE'.

-->

<data key='user.com.ibm.lotus.sametime.proxyserver.job' value='INSTALL'/>
<!-- version of Sametime to install, 10.0.0.0 -->  

<data key='user.com.ibm.lotus.sametime.proxyserver.offVersion' value='10.0.0.0'/>
<!--

This attribute specifies if the Proxy server will co-exist with a SCC server

Set this value to TRUE if SSC is installed on same machine as Proxy Server 

  It is case-sensitive and the only valid values are TRUE and FALSE

-->  

<data key='user.com.ibm.lotus.sametime.proxyserver.ssc.coexist' value='FALSE'/>
<!-- 

On non-windows platforms this attribute should point to a temporary directory that

can be used for storage of files used by the installer. I needs to be on a disk with

greater than 1GB of free space

-->

<data key='user.nonWin.temp' value='C:/IBM/WebSphere/STtemp'/>
<!--

This is the Language code for the language version you wish to install

e.g. de for German, zh for Simplified Chinese

-->

<data key='cic.selector.nl' value='en'/>
<!--

    These parameters specifies database credentials and hostname. Get the encoded DB password using the generateEncodedPassword utility

available in the download package. The default port for DB2 is 50000.

-->

<data key='user.com.ibm.lotus.sametime.proxyserver.dbport' value='50000'/>    

<data key='user.com.ibm.lotus.sametime.proxyserver.dbhostname' value='@@DBHOST@@'/>

<data key='user.com.ibm.lotus.sametime.proxyserver.dbname' value='@@DBNAME@@'/>

<data key='user.com.ibm.lotus.sametime.proxyserver.dbuser' value='@@DBUSER@@'/>

<data key='user.com.ibm.lotus.sametime.proxyserver.dbpass' value='@@ENCODEDDBPASSWORD@@'/>

</profile>
<install modify='false'>

<!--

The features parameter of the offering element identifies what features are to be installed.

If installing with SSC, it should be set to 'CEMain,nossc,ssc'

If installing without SSC, it should be set to 'CEMain,nossc'

The id parameter should not be altered of the installer won't work

In the profile name the ® character is represented by ® 

This representation is safer if the file is edited with a tool which does not support Unicode properly

-->

<offering profile='IBM® Sametime® Server Platform' features='CEMain,nossc' id='com.ibm.lotus.sametime.proxyserver'/>

</install>
<!--

This next parameter specifies the location of the temporary cache where

Installation Manager stores files during install e.g. C:/Program Files/IBM/IMShared

-->

<preference value='C:/IBM/IMShared' name='com.ibm.cic.common.core.preferences.eclipseCache'/>

<!--

This parameter specifies whether or not the installer should search for possible updates on the web at ibm.com

Since Sametime does not maintain a fix repository on the web this should always be set to false because if there is no

connection to the Internet and it is set to true users may get error messages when it looks for the repository

(and the repository will not contain fixes anyway)

-->

<preference value='false' name='offering.service.repositories.areUsed'/>

</agent-input>

Installing Sametime 10 Limited Use

A slight delay on this blog, which I promised to write last week, but I have a good excuse. My original plan was to do an in-place upgrade as Sametime 10 is still 32bit-only enabling it to be upgraded on top of your existing Community Server so long as the underlying Domino install is at least 9.0.1 FP10 32bit. However the system requirements support Windows 2012 and Windows 2016 servers, but not Windows 2008 which was what the server I planned to upgrade was installed on. Yeah, it’s been a while since we had a major Sametime upgrade 🙂

Change of plan. I decided to start over first by building a standalone Community server and then adding the Proxy Server all without a System Console.

The documentation for this install is a PDF file that is linked to on this page https://www-01.ibm.com/support/docview.wss?uid=ibm10887399. My write-up below is based on my own install using that documentation.

Installing Domino

I built a new Windows 2016 Standard server and installed a new Domino 32 bit 9.0.1 FP10 server on it. IBM Fix Central still has FP10 accessible on it so you can still get it from there.

  • Windows 2016 is a supported server operating system for Domino 9.0.1, so I went with that as it will also support future upgrades.
  • We know that the next major Sametime version is meant to be 64bit-only, so we’re not going to be able to upgrade over 32 bit Domino without uninstalling and re-installing but at least I won’t have to rebuild the entire machine. However, for a customer I’d probably do a side-by-side upgrade so I could have a fallback to the existing Community Server.
  • I like to install Sametime in its own domain as Sametime uses LDAP for authentication and even if that LDAP is a Domino Directory you can’t point to the Directory running the Sametime server.
  • Having the Sametime Community server in its own domain means I can upgrade Domino and upgrade Sametime without touching anything else such as my mail or application domain.

My Domino server then is built as an Enterprise server (which doesn’t need to be licensed separately if you’re only using it for Sametime) in its own domain and with minimal services (remove things like Calendar, Scheduler, RNRMgr from starting up) but leave HTTP.

Installing MongoDB

MongoDB is new to the Sametime requirements and also temporary. It is needed for storing of chat history, but HCL have said they will be changing the DB platform from Mongo in v11 to something else and providing tools to move the data to the new database store at that point. You don’t need to be a MongoDB expert for this step.

First we need to download the right version of MongoDB and separately the Compass add-on.

MongoDB Installer

Compass Addon

The supported MongoDB version is 3.6.5 and fixpacks specifically. Once downloaded we run the installer, make sure you uncheck the box to install “Compass” during the MongoDB install or the install will fail.

Choose “Complete” on this screen

Un-Check this box which is checked by default or the install will fail.

Once completed we then run the Compass installer separately

Now we’re almost ready to start and configure MongoDB. When the server starts it will expect to find the data and log directories so these need to be created in advance or the start will fail. The default locations for those are c:\data\db and c:\program files\mongodb\logs\log.txt (I don’t use these in general but created them purely for the first server start).

Run the mongod.exe first from the install directory which by default is

C:\Program Files\MongoDB\Server\3.6\bin

from a command window run “mongod.exe” which will start the server instance and end up listening on port 27017. Do not shut the server window if running in the foreground at this point!

Now we want to issue commands to the server via the Mongo command line tool which we run using “mongo.exe” from the same directory.

Out of interest at this point if you type the following in a command window you should see both the server listening and command window established connections:

netstat -an |find /i “27017”

Checking The Schema

We now need to make sure the schema version for MongoDB is set correctly to support Sametime’s requirements. From the mongo command window type

use admin
db.system.users.remove({})
db.system.version.find()

my request returned “{“_id”: “featureCompatibilityVersion”, “version”: “3.6”}” so I used the command below to set it correctly then restarted the Mongodb server.

db.system.version.insert({ “_id” : “authSchema”, “currentVersion” : 3 })

The documentation now wants us to add MongoDB as a service using the following instructions however I had problems with it as although it installed as a service it then refused to start returning a 1053 error. After a couple of hours trying to fix that which seems to be Windows related I went another way to get a working service.

This is what the documentation said to use (sc is found in c:\windows\system32 if your path can’t find it)
sc.exe create MongoDB binPath=”\”C:\Program Files\MongoDB\Server\3.6\bin\mongod.exe\” -service — config=\”C:\Program Files\MongoDb\Server\3.6\mongod.cfg”” DisplayName= “MongoDB” start= “auto”

I ended up removing that service since it wouldn’t start (sc delete MongoDB) and adding it using a different syntax from the Mongo bin directory itself

mongod -directoryperdb -dbpath C:\data\mongodb\ -logpath C:\data\mongodb\log\mongo.log -logappend -service -install

That installed the service which started with no problems, including writing to the log file in the new directory I configured on the command line (again the directories have to exist first).

So now Mongodb is installed and running, let us move onto configuration.

Configuring MongoDB

Launch the Mongo Compass Community from your Windows start menu and connect to your locally-running server.

I don’t need to change any of these settings - just press “Connect”
Once connected I am shown a list of existing databases. These are all system databases so don’t delete any of them!

Now we need to create a new database for chatlogging and collections within that new database. Click the “Create Database” button and complete the dialog as shown below. Keep the naming and capitalisation identical to what is shown here, Database Name “chatlogging”, Collection Name “SESSIONS” . If you don’t you will need to modify the sametime.ini later.

Once the database is created we can click on it for further configuration

The documentation wants us to create an additional Collection called “EVENTS”, so we click on “Create Collection” and do that.

Having created the new chatlogging db we need to set up a Mongo user account and give that admin access. We do all this from the Mongodb console again which is accessed by running mongo.exe.

The documentation specifies using the user name “sametimeUser” and the password “sametime”. If you use a values you will need to edit the MongoDB settings in Sametime.ini once you complete the Sametime configuration steps.

The command below not only creates the user but also gives that new user admin rights to the chatlogging database.

use admin

db.createUser({user:”sametimeUser”,pwd: “sametime”,roles:[{role:”readWrite”, db:”chatlogging”},{role: “userAdminAnyDatabase”, db: “admin”}]})

Installing Sametime Standalone

With Domino shut down we can now install the Sametime Community Server. We don’t need a System Console in place before doing this.

Configuring Chat Logging

There are three components to configuring chat logging on the Sametime server:

  1. Enable Chat Logging through stconfig.nsf so the server knows to support it.
  2. Configure the policy files to enable chat logging.
  3. Point the Sametime chat logging to the MongoDB.

Open STConfig.nsf on the server and find the communityservices document then edit that and change the Chat Logging parameter to “relax”

Now we need to modify the XML files that control the policies. We can find those in the Domino program directory and can open them with a text editor.

  • In policies.server.xml set the “current-value” of offlinemsgs.community.enabled to “1” instead of “0”
  • In ‘OfflineMessages.xml’ set the ‘current-value’ of offlinemsgs.community.enabled to “1” instead of “0”
  • In ‘policies.users.xml’ file set the ‘current-value’ of im.enableOfflineMessages to “1”. There will be multiple instances of that value, one for the default and one for the anonymous policies that are available on a standard install.

I will be talking more about manually setting and creating policies in a later blog. The documentation provides a reference URL to detailed policy settings but that URL now returns a 404 so I’m checking with HCL for an updated link.

broken link: https://www.ibm.com/support/knowledgecenter/en/SSKTXQ_9.0.1/admin/admin/admin_policy _im_ids.html

In addition, whilst you have policies.users.xml open you can enable the persistent chat feature by setting im.persistentChatEnabled to “1”.

Our last step in this configuration is making sure Sametime knows how to reach MongoDB and your new chatlogging database. If you used the default settings in the documentation and as I’ve documented here and MongoDB is installed locally to the Sametime server then you should not need to change any values, but for reference, and in case you do, the default settings in Sametime.ini are as follows:

[stconvomap]
MONGO_URI=mongodb://127.0.0.1:27017
MONGO_DB=chatlogging
MONGO_COLLECTION=EVENTS 

Chatlogging.ini
CL_MONGO_HOST=127.0.0.1
CL_MONGO_PORT=27017
CL_MONGO_USER=sametimeUser
CL_MONGO_PASSWORD=sametime 
CL_MONGO_AUTH_DBNAME=admin CL_MONGO_DBNAME=chatlogging 

Now give everything a restart and confirm that it all works!

In my next blog I’ll be looking at installing the Sametime Proxy Server again without using the System Console so that I can get access to the new web client and the mobile cilents which are part of the Limited Use entitlement.


Here we goooooooooooooooo

I’m delighted to finally see the completion of the HCL deal to acquire all of the previous IBM Collaboration products including Notes, Domino, Sametime and Connections. This means that as of today IBM no longer has any ownership of these products and any current and future licenses and support have been transitioned to HCL.

As you can imagine this has been a huge undertaking (well I can barely imagine much of it) and so I expect a few bumps before everything settles in but HCL have already been working hard to get everything (and most everybody) moved over and let’s all give then a chance. They believe in the products and are committed to them in a way we haven’t seen in many years and it’s great news that some of the most well known names in the industry are moving over to HCL to join their Domino and Sametime colleagues including Maureen Leland, Mat Newman, Wes Morgan, Adam Gartenberg and Dave Kern. There are plenty of other people I could mention but since they haven’t personally gone public I don’t want to do so.

I’ve been working with the HCL teams for over a year and I can’t say enough good things about their approach, it is something very refreshing to those of us who have been jaded by the past few years.

http://bit.ly/HCLSoftware

I (Truly) Know Nothing But….

I have no idea the status of the HCL/IBM deal nor what will happen once the deal is signed and IBM no longer have any ownership of the (former) ICS products BUT….

I will be spending the rest of this week downloading any ICS software and fixes I might potentially need over the coming weeks from the IBM Software Access Catalog and Fix Central sites.

I am sure both HCL and IBM have plans for transitioning the downloads and all the data but this is a huge deal and personally I’d like to be self sufficient on day 1 (whenever that is).

Redesigning Templates - A HCL Design Project

I’m very pleased to announce the launch of a new project I am working on with HCL to reinvigorate the Notes and Domino templates as they roll out on new client platforms such as iPhone, tablet and a lightweight web client. See here for more information on the project.

My role is team co-ordinator and I will be responsible for bringing in the right resources to meet each stage of the project. I’ll be working closely with the team leads including HCLs design lead Felix Kalka, Theo Heselmans, Carl Tyler and Tim Davis. More about our team here

We’ll be keeping you updated on progress, asking for feedback and gathering ideas through the blog and surveys. We want to start with a very quick survey on discussions and teamrooms, please take a few minutes to complete it.

We really need your input if we’re going to get this right https://www.surveymonkey.co.uk/r/96LYTDK

If you are attending the Factory Tour in Chelmsford in July I will be there with Felix to talk about our work so far, to hear about your use cases and to share ideas for each client platform. If you aren’t at the Factory Tour and would like to discuss your use of any of the standard templates, please reach out directly to me via twitter (@gabturtle) or email (gabriella at turtlepartnership.com).

Details of the project, the team and our goals can be round on the new Template Experience blog here https://templateexperience.com. We plan to keep the blog updated with our progress, sharing ideas and asking you to complete surveys as we move forward.

This is a great opportunity to push our design thinking beyond the traditional framework and I thank HCL for commiting to the project and work involved.

Sametime v10 - Technology Changes Galore

Sametime v10 Limited Use shipped last week and later on this week I’ll be posting a step by step guide to my install but for now I wanted to talk about the technology changes that it brings. This release focuses only on the Community server elements, the other components such as Meetings will be part of the v11 version which is due to be released along with Domino v11 towards the end of 2019.

My thanks to Mat Newman who posted this updated roadmap on his blog where he also shares more detail about the licensing

20190601 Sametime Roadmap - Current

“Entitlement” is part of your Notes licensing and enables you to use the chat features of Sametime inside the Notes client, the browser mail cilent , a web client and the standalone mobile client.

The largest changes for the clients in v10 are the support for persistent chat (and chat history) across multiple devices, an improved conversation UI, a new lightweight web client, and the removal of the System Console as a requirement for the Community server install.  Those are all great changes that justify an upgrade to your existing Community servers by themselves.

Starting with the biggest technology change, the System Console (which itself required WebSphere and DB2) is now optional and it is possible to install and manage a Community server entirely on Domino. However if you want to use either the browser client or mobile client you will need to still install the Sametime Proxy server which does still require WebSphere and DB2.

To maintain the persistent chat across devices, a server-side storage solution is required and in this release it is MongoDB.  HCL have committed to replacing that in v11 and having a data migration solution out of Mongo so it’s a temporary solution.

You may have heard that Sametime 10 will be 64 bit only on Domino but in fact this first version still requires Domino 32bit and at least 9.0.1 FP10 version.  Domino 10 is 64bit only so right now Sametime 10 cannot be installed on Domino 10.  That does however make it suitable for an in-place upgrade to your existing servers which will already be on 32bit Domino.  This is still very early in the release and the technical requirements are not yet published but will eventually be here .

Last week HCL hosted a webcast where they introduced Sametime v10 and answered questions, I’d recommend looking at the Q&A and watching the webcast here

I have been documenting my own install this weekend - I opted for an in-place upgrade as I assume that’s what the majority of people will be doing on this release, and will be publishing that in the next couple of days.

Domino Query Language @ Engage

By Tim Davis, Technical Director

This is my session given at Engage 2019 in Brussels last week.

“In this session, Tim Davis (Technical Director at The Turtle Partnership Ltd) takes you through the new Domino Query Language (DQL), how it works, and how to use it in LotusScript, in Java, and in the new domino-db Node.js module. Introduced in Domino 10, DQL provides a simple, efficient and powerful search facility for accessing Domino documents. Originally only used in the domino-db Node.js module, with 10.0.1 DQL also became available to both LotusScript and Java. This presentation will provide code examples in all three languages, ensuring you will come away with a good understanding of DQL and how to use it in your projects.”

Domino Server Health - Monitoring and Managing @ Engage

This is my session on Domino Server Health given at Engage in Brussels last week.

If you’re a Domino administrator how do you decide what to monitor on your servers and how to manage them ? What are the key things to monitor? How do good practice management tools such as statistics reporting, DDM, cluster symmetry, database repair and policy settings make your work lighter and faster. Finally we’ll talk about some of the “must dos” in the day, week and month of a Domino admin.

Face/Off Domino vs Exchange On Premises @ Engage

Here is my presentation discussing how Exchange and Outlook on premises differs from Domino and Notes given at Engage in Brussels last week.

I hope you find it useful, this was my first presentation pulling together my ideas from the past few years of working with Exchange on premises integration projects.

How do Exchange on premises and the various Outlook clients line up against Domino on premises and its clients? In this session we’ll look at the configuration options and management interfaces for each server as well as the client options and client behaviours. We’ll also discuss the general ecosystems, considerations for migrating or co-existing and lessons learned. A great session for Domino admins who want to know more about the other side.