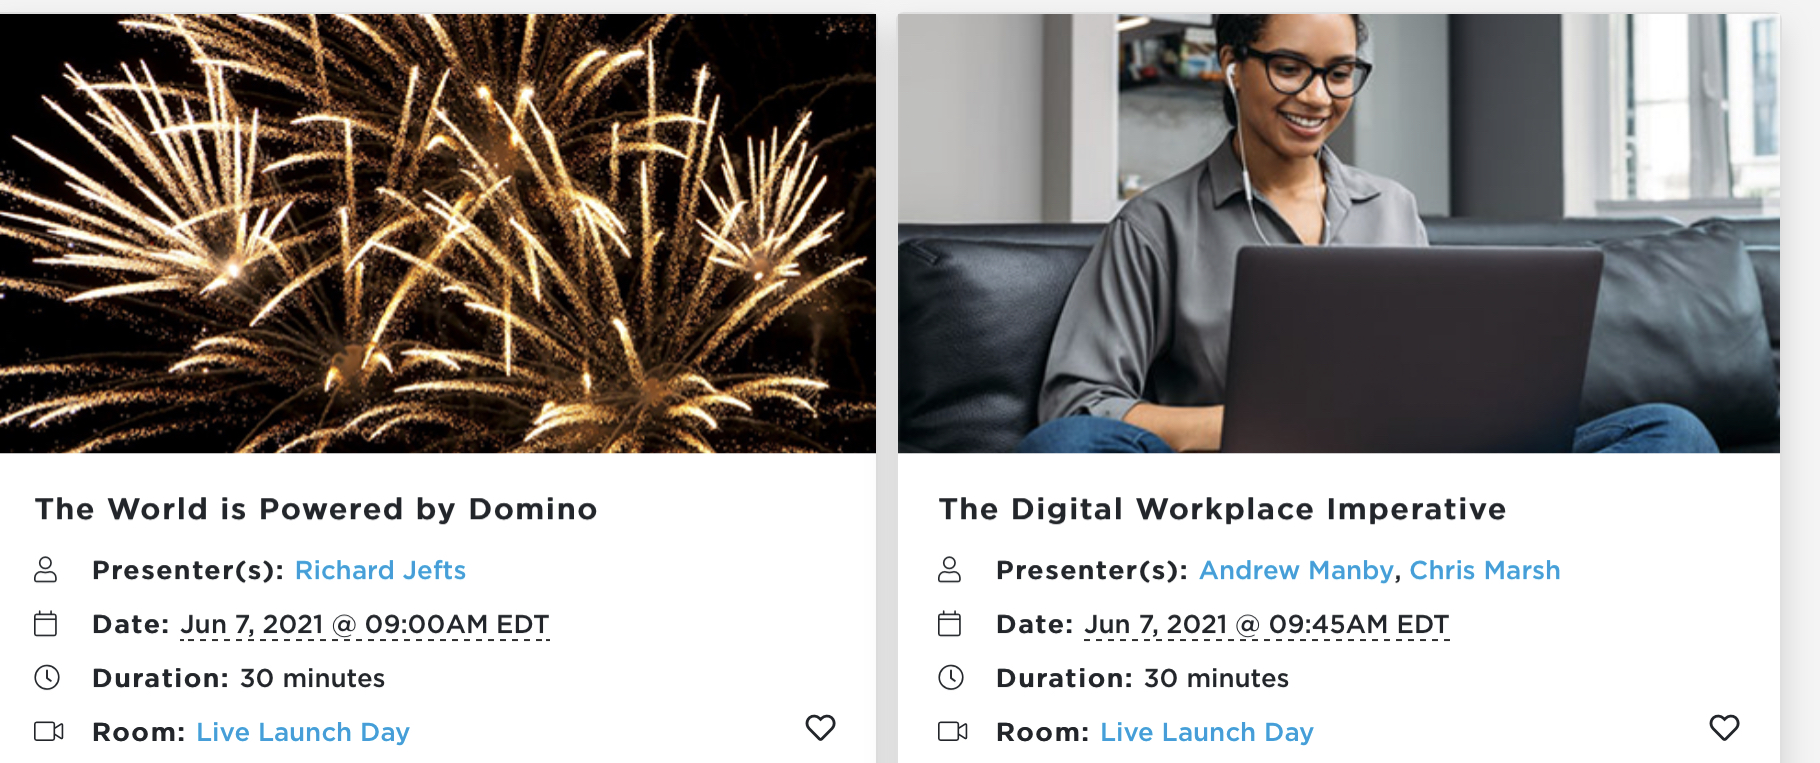
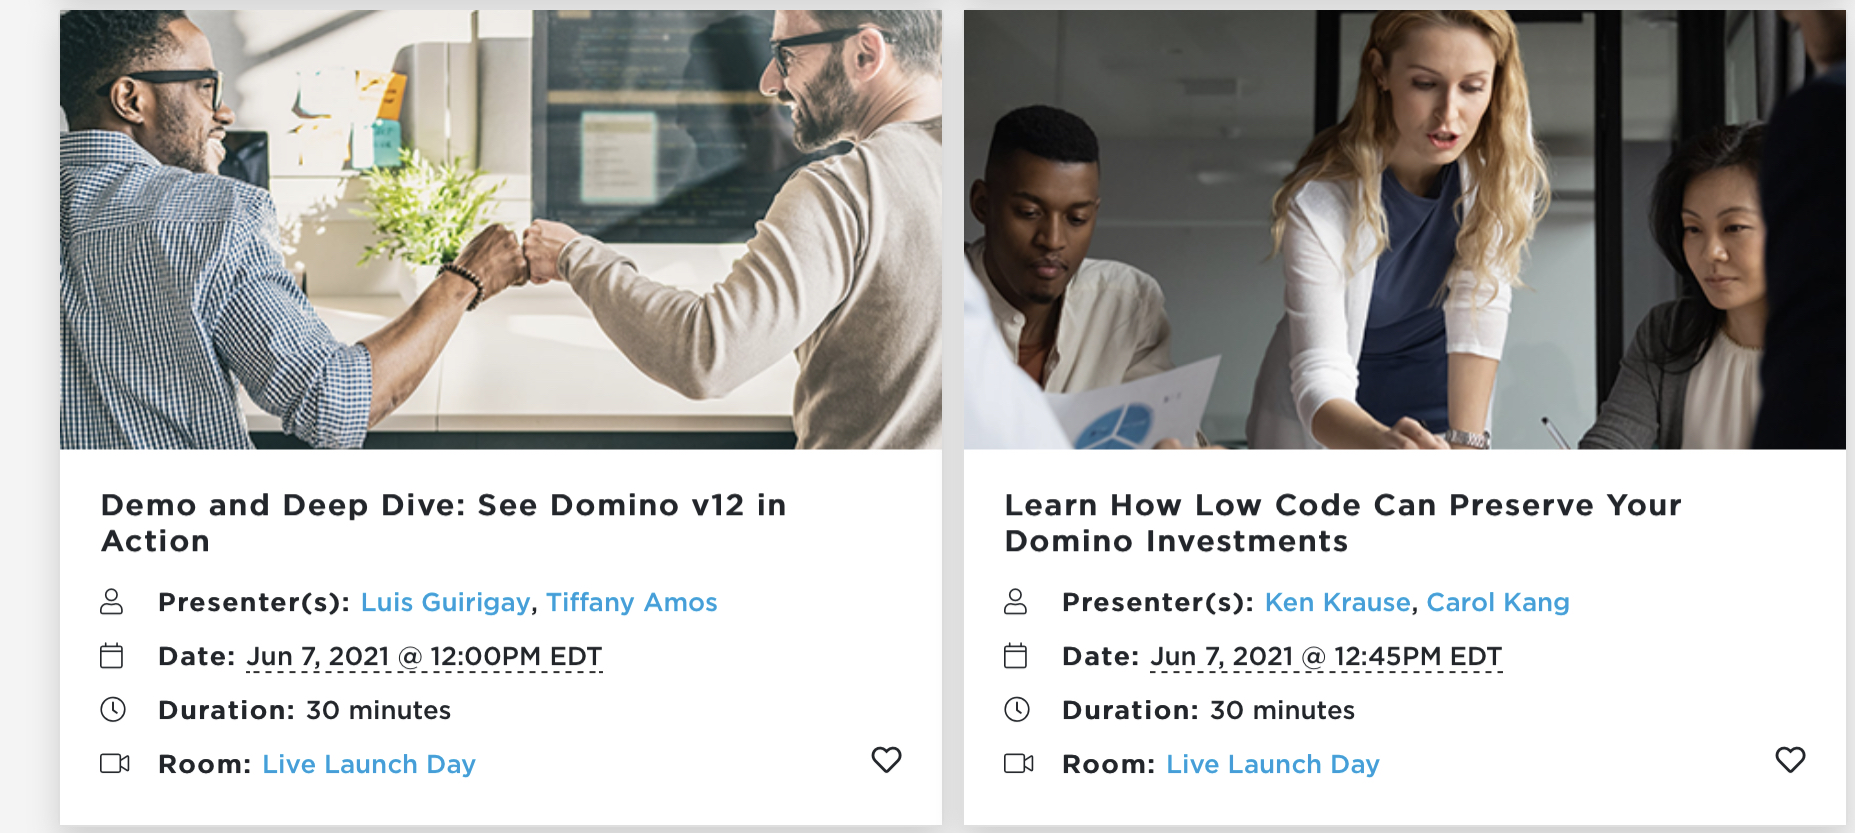
If you registered for today’s HCL v12 launch event and have not received a link to the agenda - click here and login with your registration credentials.
Or click here to register then login. 9am EST / 2pm BST start. Here is a sneak peek at the launch day sessions.
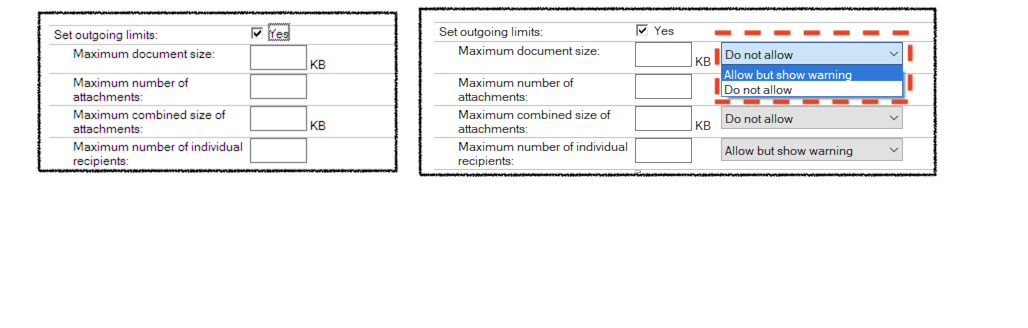
In v12 we can use the Outgoing Mail Limits controlled by policy mail settings to not only set a limit on maximum mail sizes but also what to do with emails that are above that limit. Previously the user would press “Send” and the mail policy would trigger warnings and refuse to send the mail if the limits were exceeded.
The change in v12 is that for each inividual outgoing limit setting
Maximum document size
Maximum number of attachments
Maximum combined attachment size
Maximum number of recipients
you can choose to refuse to send the email entirely or to allow it to send after the user is presented with a warning.
On the left is a Mail Settings policy for Outgoing Limits in v11 (and v10) and on the right the changes for v12. To find these options go to the “Mail” then “Basics” tab on your mail settings for a policy. Since this is controlled through a policy you can easily create different settings for different divisions, servers, or users if you want to allow some to accept and route larger mail messages and others to refuse them. By choosing “All but show warning” you aren’t refusing the user’s mail but you are hopefully making them more aware of good mail behaviour.
HCL have, for the first time, introduced Domino-native backup and restore tasks in v12 which you can configure in Domino and run via the Domino console. I can backup to a file system but I can also configure the tasks to integrate with a 3rd party solution if I have one in place already. It’s a very unexpected and welcome feature especially for smaller companies or administrators who want to do ad hoc backups and restores of individual databases without co-ordinating with the backup team.
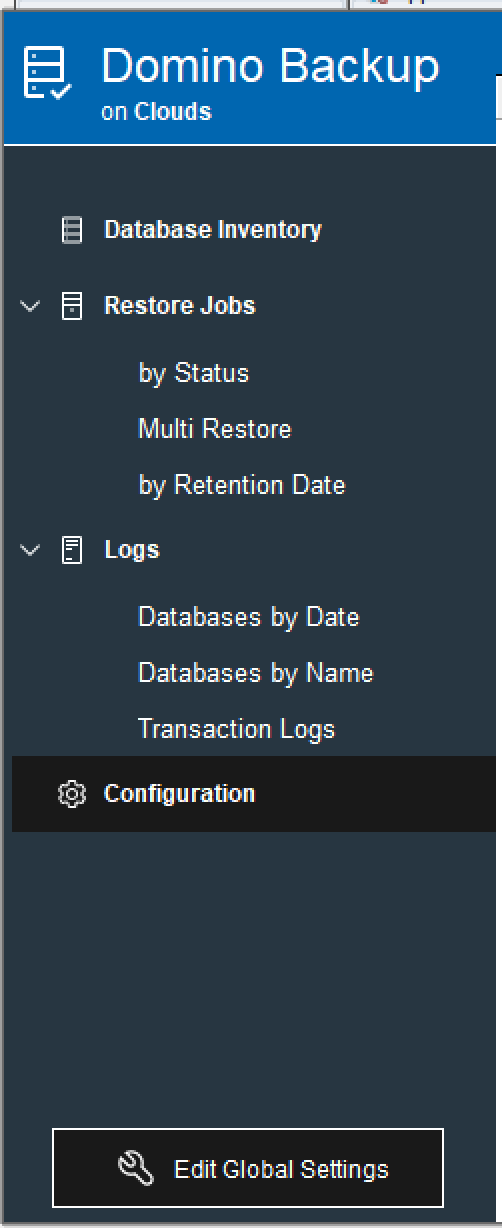
Getting Started
There’s a lot of optional and incredibly advanced settings (full documentation of all that is here) but let’s start by doing a simple backup and restore of a single database so you can see how easy it is. A lot of screenshots follow because I want to step you through the process but you’ll see there’s very little setup for you to do.
DominoBackup.NSF
The configuration is all done through a new database called dominobackup.nsf which is automatically created on a server when you type “Load Backup” on the console (if it doesn’t already exist). Once done you can open dominobackup.nsf on the server. There is nothing special about this database other than its name so you can replicate it to other servers once it’s set up and if you want the same configuration.
Let’s start with checking the Global Settings by clicking on “Edit Global Settings”
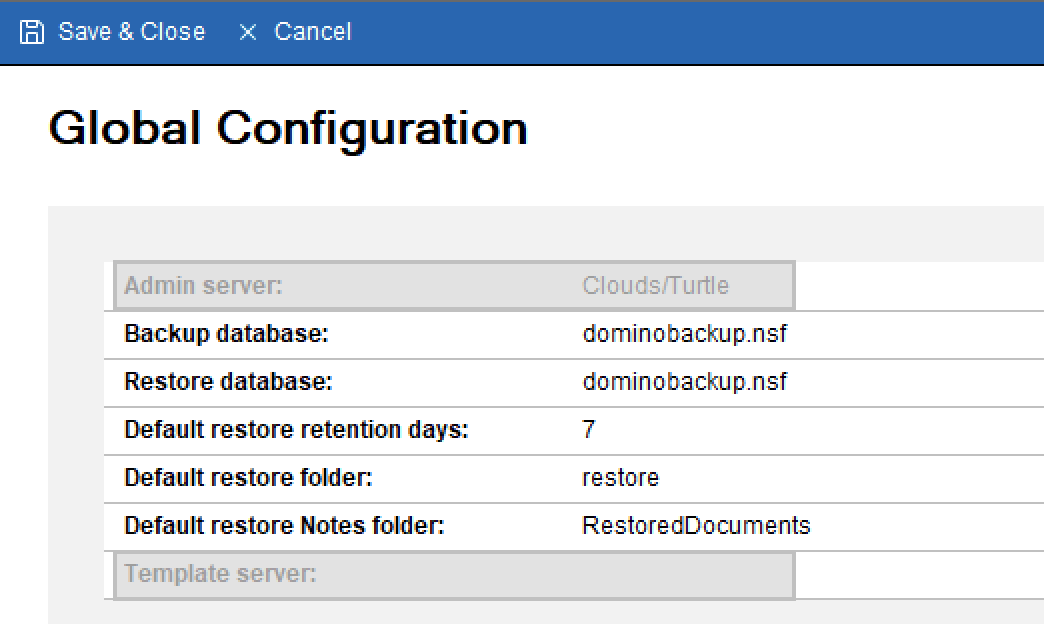
The above is a default Global Configuration document in a new database. The Admin and Template server fields are currently ignored in Domino and unused in code.
Backup database and Restore database refer to where activity is logged, not where the actual databases are located.
Restore folder is a folder under the Domino data directory where databases are restored to. Later when we do the restore we will see the option to maintain subdirectory hierarchy under that.
Default restore retention days refers to how long a restored database will stay on the file system before Domino will remove it with a prune command
Default restore Notes folder refers to a Notes database folder (as opposed to a file systen folder) where documents can be restored to if you were doing a restore of specific documents from a backup into a production database.
Remember this is a Global configuration document so the settings here will apply to any server this database is sat on.
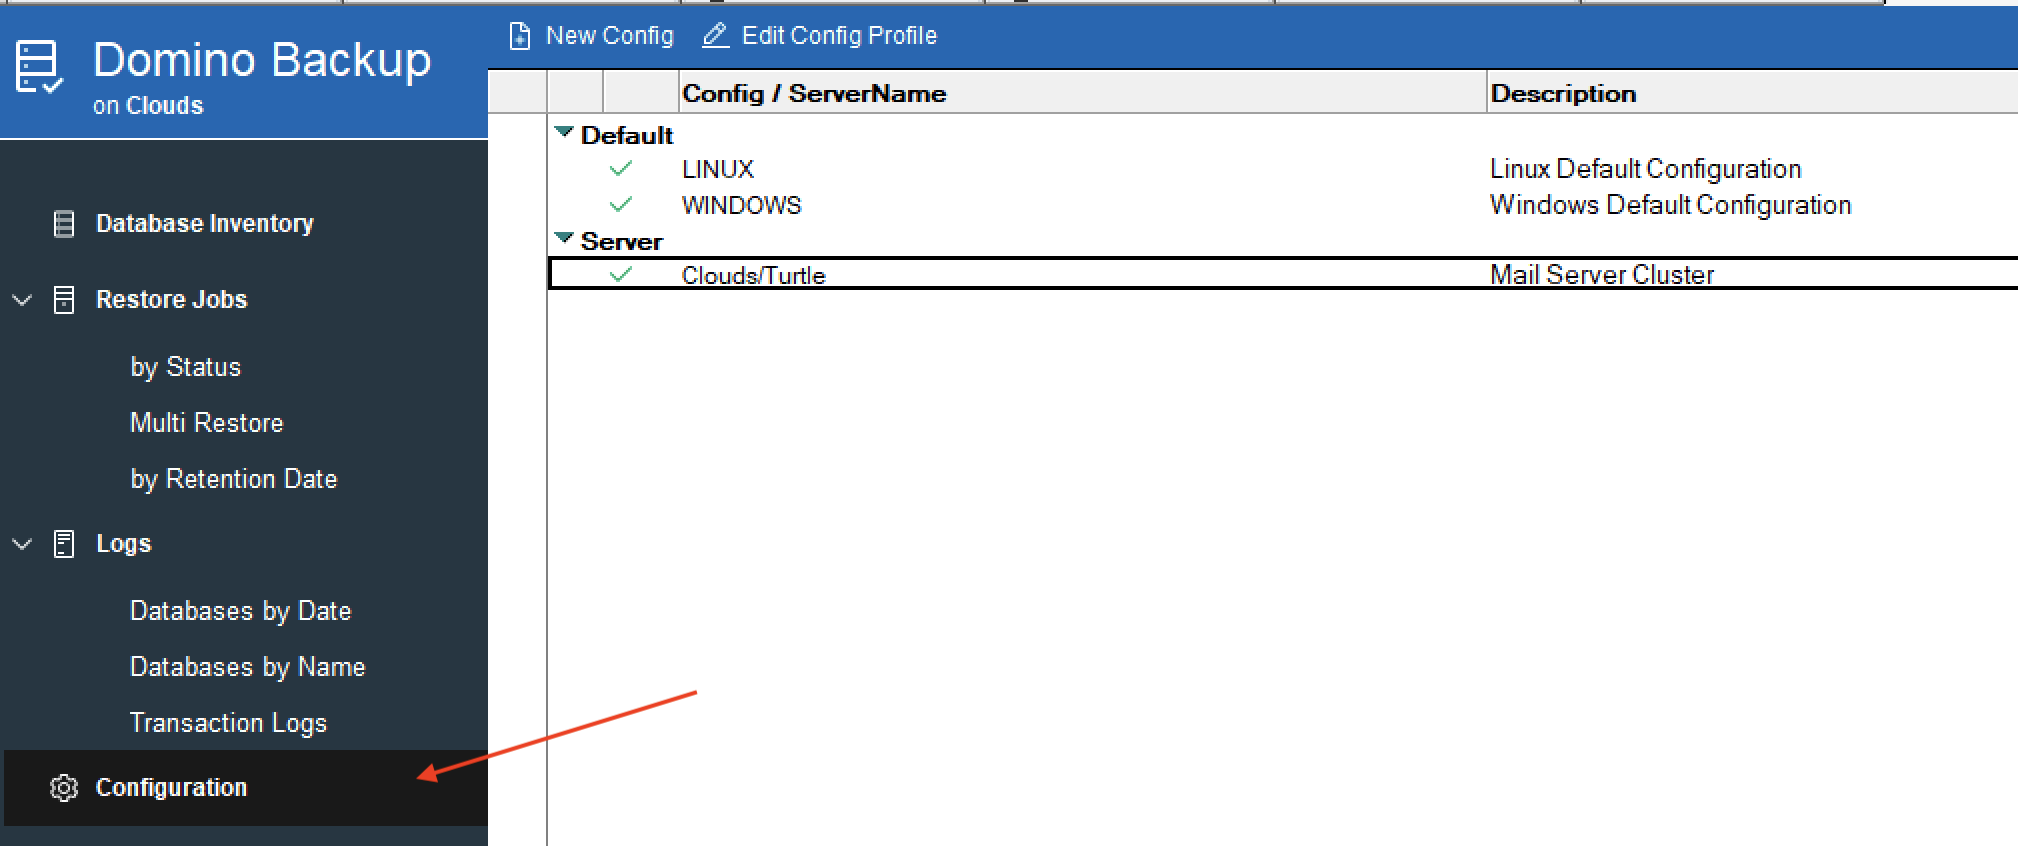
Now let’s set up a backup configuration. In the configuration view you will see two default documents, one for Linux and one for Windows. You can use these configuration documents and amend them as needed but I made a new config for the server “Clouds” as I wanted to configure its settings differently from the default ones. You don’t have to create server-specific configurations if you are happy for all servers with a replica of this database to use the same configurations.
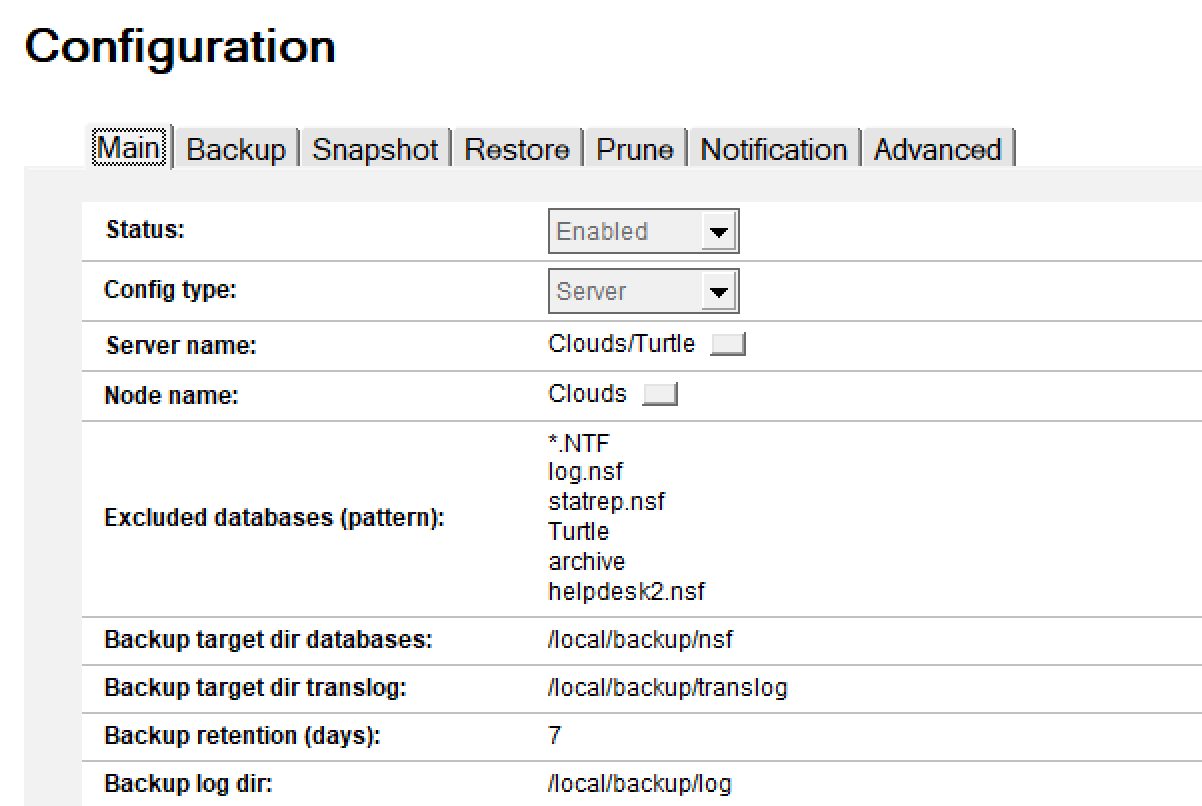
Let’s take a look at the configuration. We’re not going through every field in this blog (there’s a lot), but the ones I think are important to doing our simple backup of a database. The settings below were used to backup and restore databases to the file system on a Linux operating system although a similar configuration could be used on Windows, with obviously different paths.
Config Type can be either “Server” or “default”.
Server name becomes “Platform” if you choose “default” for config type. You can only enter a single server name here
Node name defaults to that of the server and will be used in creating the filepath for the backups. You can change the Node name if for example your server name is long / has spaces / is unsuitable for filepaths
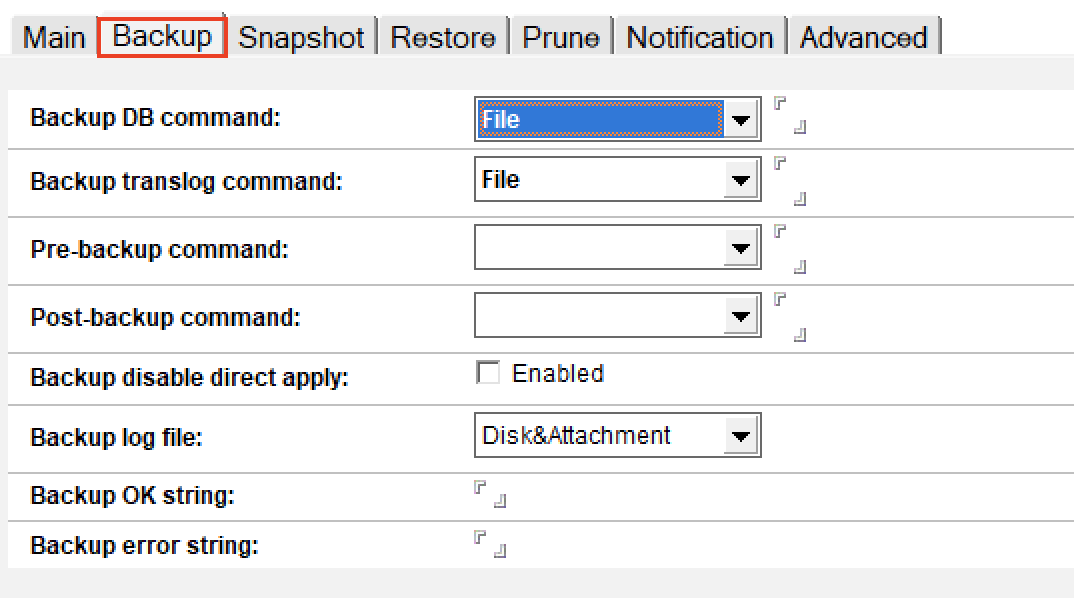
Excluded databases use wildcards and file extensions or directories to tell the backup to ignore certain databases. The default is to back up all NSF and NTF files (but not NLOs - more on that later). This field is multi-value so you can enter (for example) *.NTF; Mail\restore\*.nsf; log.nsf
Backup retention days is taken from the Global Configuration document we set up earlier but can be changed here. Once a backed up database goes past this age Domino can/will delete it
Backup DB & translog command. We have a choice of “File” ; “Cmd Formula” ; “Agent” and “Cmd”. All but file refer to integration with 3rd party backup systems so for our purposes we are choosing “File”
Leave Backup disable direct apply unchecked
Backup log file - when performing a backup Domino can create a log document in the dominobackup.nsf database and/or create log files on the file system. By selecting Disk&Attachment I am asking it to do both so both network administrators and Domino administrators can easily read the logs
No other settings are needed.
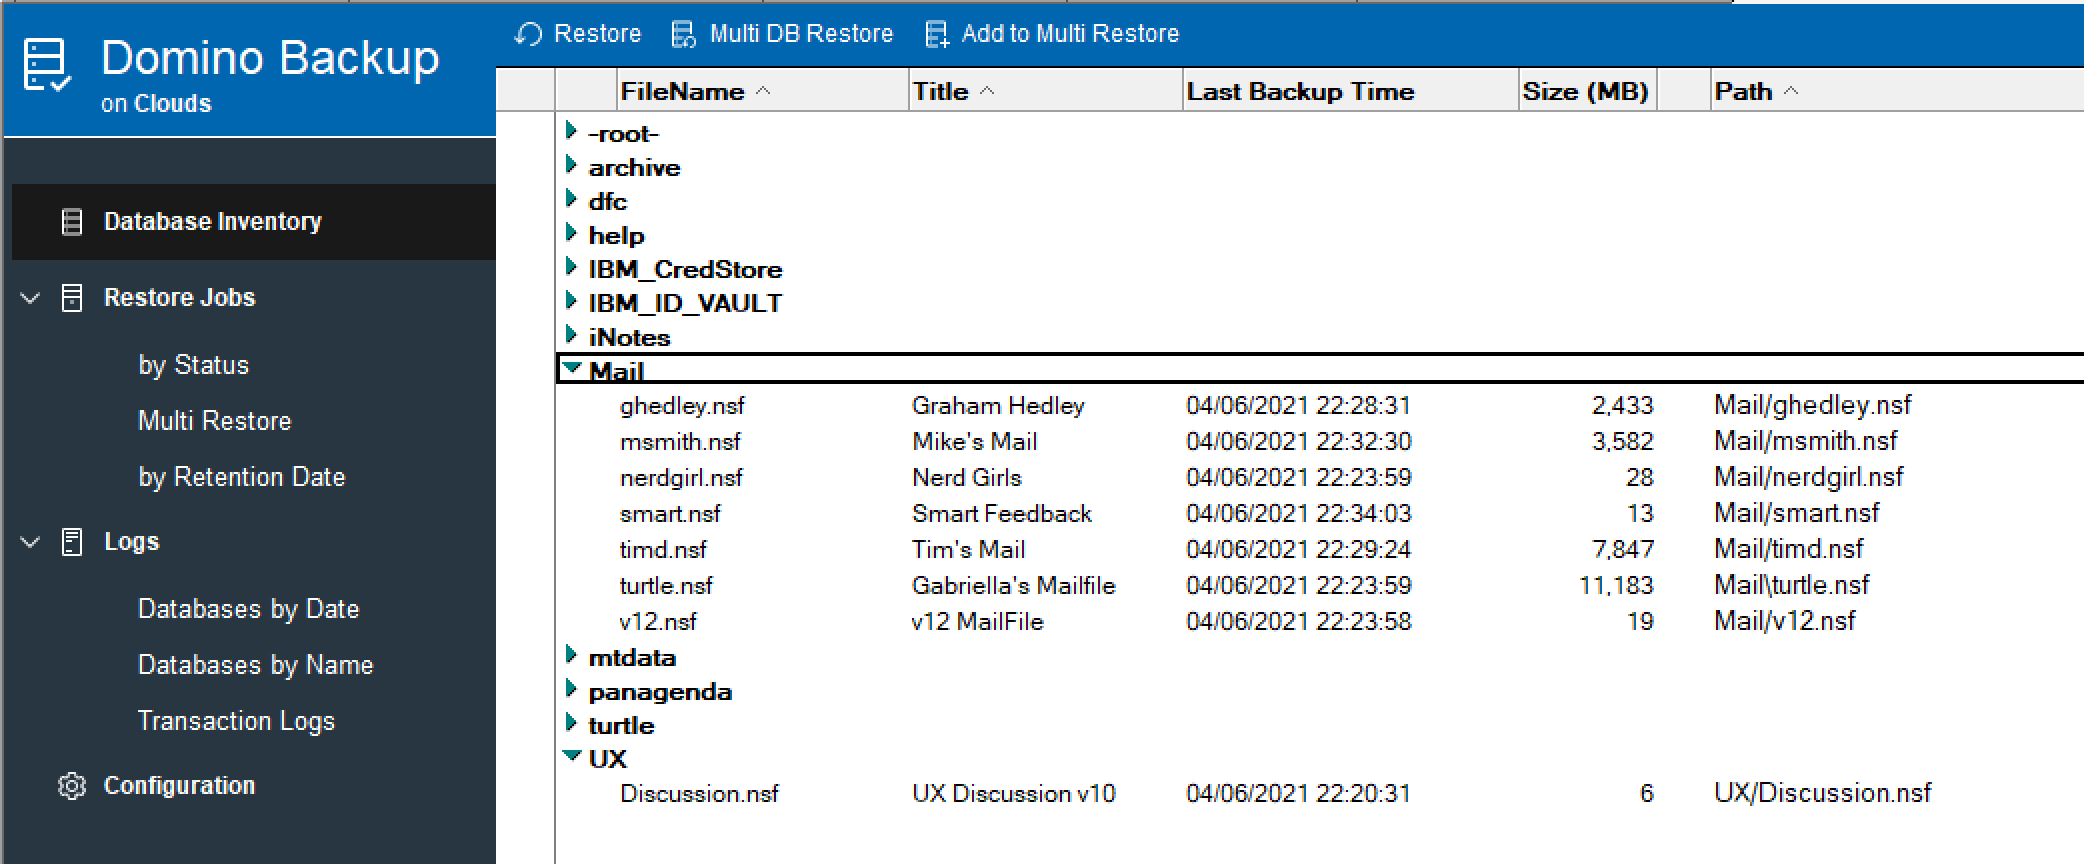
After filling in this tab and saving the document I ran a test by typing “load backup” on the console of the server called Clouds. When the backup completed the Directory Inventory view showed a list of all the backed up databases.
I looked at my file system to find Discussion.nsf and this is what was returned - the original database is in /data/notesdata/UX/Discussion.nsf and the backed up instance with a date/time stamp under the directory structure we set on the basics tab.
So now I want to restore this backed up database. Don’t worry, it won’t overwrite the one that’s there and you don’t need to delete the one that’s there unless you want to. This is a simple file system restore, so there are few settings for us to update.
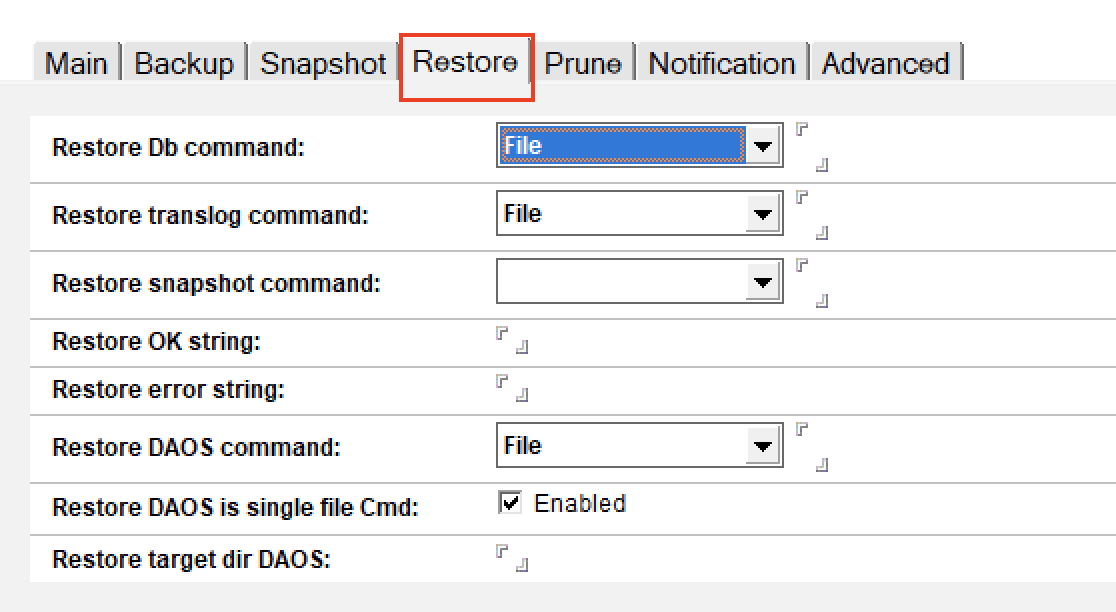
Restore Db / translog command. We again have a choice of “File” ; “Cmd Formula” ; “Agent” and “Cmd”. All but file refer to integration with 3rd party backup systems so as we did for the backup, for our purposes we are choosing “File”
Restore snapshot command is also related to integration with backup solutions that support snapshotting
Restore DAOS command and the other DAOS options require you to be using a 3rd party backup solution to handle your NLO backups. For our purposes here we aren’t doing that.
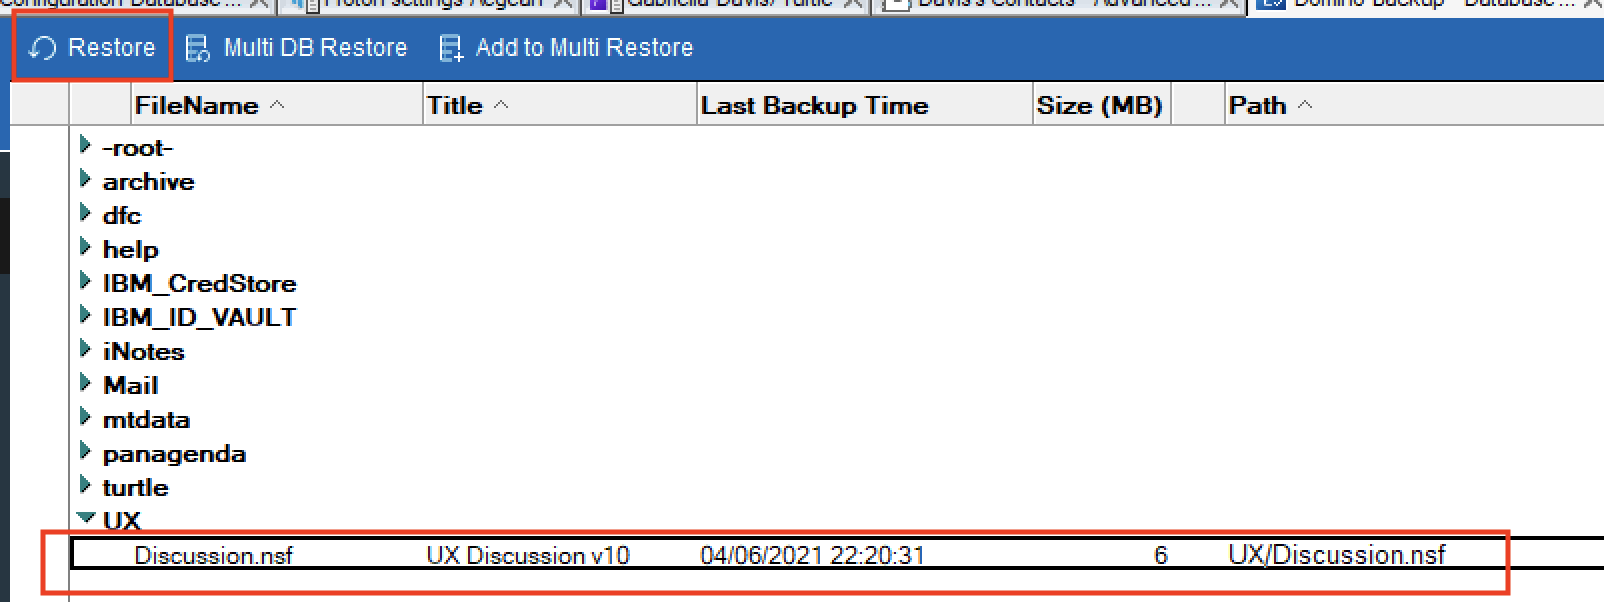
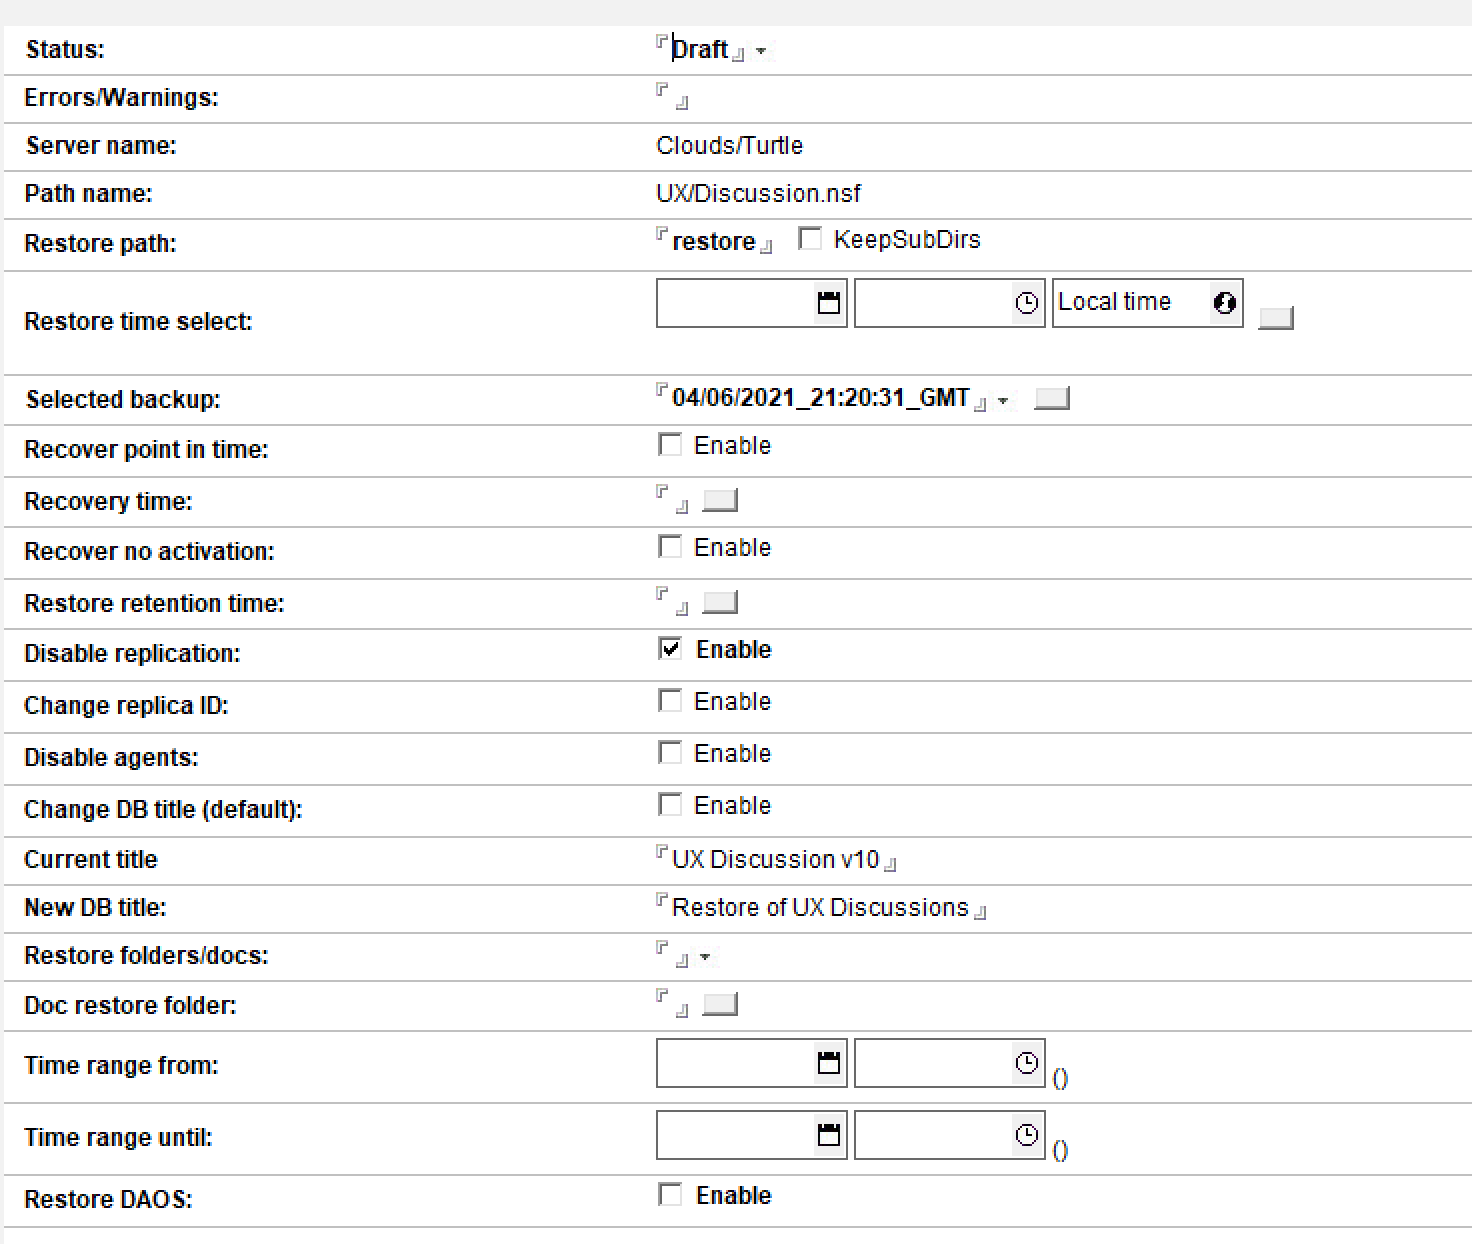
So now everything is configured I just need to tell the server what databases I want to restore. Again we go to the Database Inventory view to select a database that has been backed up (I can only restore what I have managed to backup). Find the database you want to restore and select it in the view then click the “Restore” button at the top of the screen.
That will open the Restore Job document (you can also select multiple databases and choose “Multi DB Restore” but we’re not doing that here). There are a lot of fields and we’re going to ignore 80% of them, take the prefilled defaults and fill in only ONE field
Status creates as draft and changes to “Submitted” when the job is submitted but you can open an existing Restore Job and change its status and resubmit it at any time.
Server Name and Database Name are prefilled for me when the job is created so I won’t change those
The restore path comes from the Global Configuration document we set up earlier but can be changed here. It’s important to note this path is relative to the Domino data directory so the actual restore path will be (for me) /data/notesdata/restore. I don’t change it.
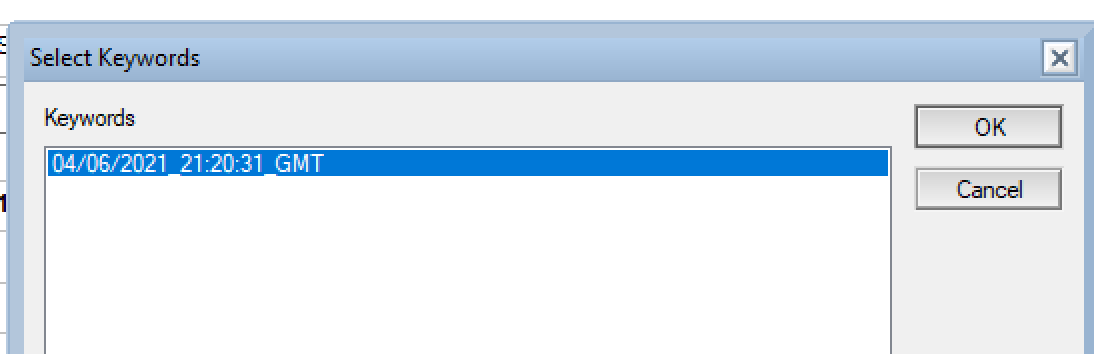
The only setting I have to choose is which backup I want to restore from, as the system assumes there are multiple backups taken over a period of time. There are two ways of selecting a backup either by a date range in which case the newest backup within that range is restored, or by bringing up the dialog for the field “Selected Backup which will give me the option to restore any backups available for the database that dominobackup.nsf knows about. In this instance there is only one so I select that.
Disable Replication is checked by default so that the restored database arrives with replication disabled and there is no risk of it replicating with any production versions on any servers (don’t forget that our restore directory is under the Domino data directory so accidental replication is a real risk otherwise).
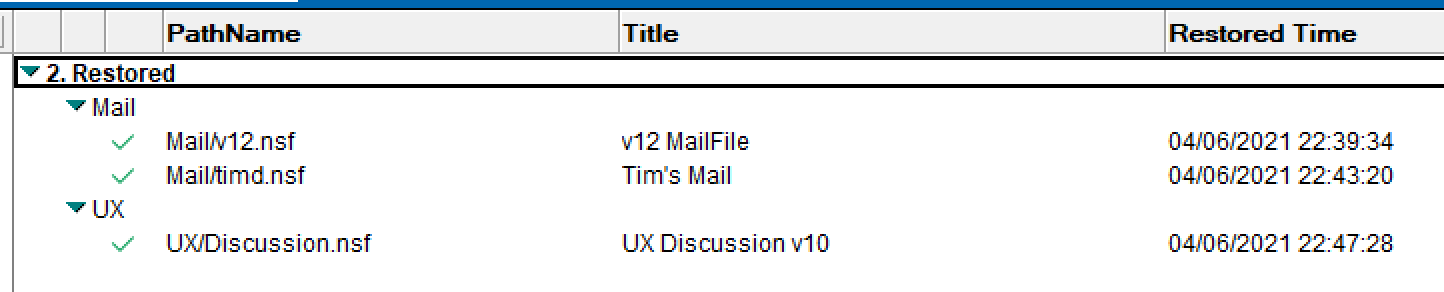
I click the “Submit Restore” button at the top of the Restore Job page and my restore job is now queued. I can now type “Load Restore” on the Domino console. It will take a few seconds, or maybe minutes if the db is multi-Gb large, and then the Restore Jobs view will update to show the restores have completed.
Now if I search my file system for Discussion.nsf I find the original database in /data/notesdata/UX, the backup copy in /local/backup/nsf and the restored copy (replica) in /data/notesdata/restore
An Important Note About DAOS and NLOs
The Backup task does not support backing up NLOs. HCL specifically require you to use a 3rd party backup system to back those up. NLOs are write-once files, they never change once created, and are just removed (pruned) when no longer needed, so it’s important to have a separate backup strategy for NLOs. Whatever backup tool you are using to back up your NLOs should be able to integrate with the Domino backup task which is why there are several fields asking about NLOs. However, consider that the default prune setting for NLOs is 30 days so a NLO will not be removed from the Domino file system until 30 days after the last instance of a document containing that attachment is deleted.
I have lost count of the number of times I’ve had to say “no sorry, quotas are replica specific so you have to set them on each server”. In Domino v12 quota settings now replicate between servers. They don’t need to be replicas in a cluster, the quota settings (or even if quotas are enabled) are replicated to any other database replica along with other database properties like the ACL. Changing a database quota requires Manager access to the database and (in my testing) the most recent change takes precedence.
If you don’t want to maintain quota settings across replicas you can add the notes.ini command Disable_Repl_Quota=1 which will prevent the instance on that server from replicating out its quota settings.
In my earlier post I talk about the new qvault command available with v12 of Domino. I wrote that post but then couldn’t publish it because when I tried to run “load qvault..” with any parameter I got the error
QVR - The local security feature is not supported for the database or server The local security feature is not supported for the database or server
I opened a support call and was told that the notes.ini setting IDV_Enable_Vault_Scan = 1 must be set on the server and the server restarted before the qvault command will work without error which I tested and confirmed.
As I posted last week, Domino 12 and Sametime 11.6 and Traveler 12 and Nomad Web 1.0 are all out and there’s lots of good news for admins, users and developers alike but since I’m an admin that’s what I’m going to talk about. Instead of a large dull blog listing all the things I think are most interesting useful, I’m going to do a series of short slightly-less-dull blogs focusing in on each one individually.
This isn’t where I tell you to deploy ID Vault - you’ve already done that right? ID Vault not only contains encrypted secured copies of all your IDs but it allows admins to do password resets against Notes IDs directly on the server and have that immediately take effect for the user. It also means never having to physically copy ids around to workstations and it can be set up in 10 mins so a lot to like but Domino 12 brings us some very welcome enhancements. If you already have an ID Vault then don’t forget to refresh its design from the v12 template called idvault.ntf on the server.
Manually Uploading An ID To The Vault
It’s now possible for both administrators and users to upload IDs to the Vault manually. Users can only upload their own IDs but anyone designated as a vault administrator can upload any user ID into the vault.
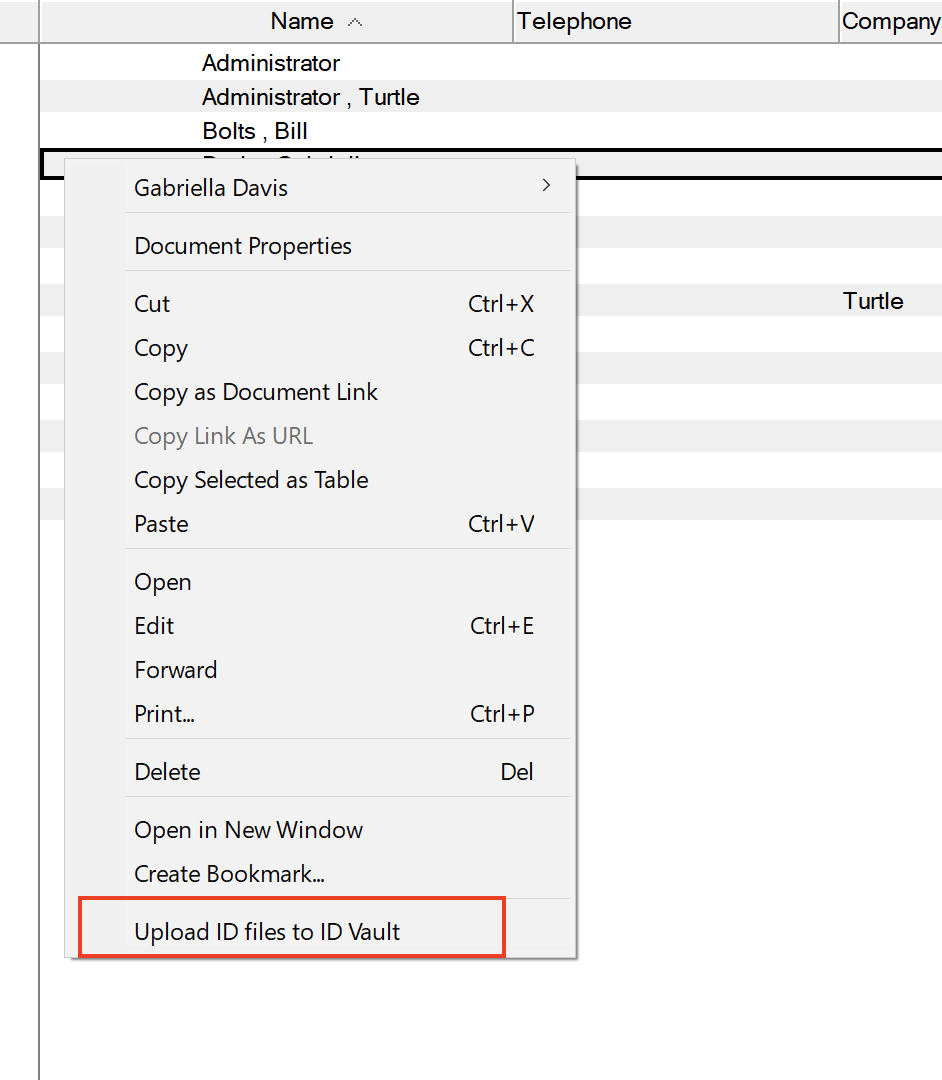
To do that as a User, open the server’s names.nsf in your Notes client, choose the People and Groups view and right mouse click (it will only let you upload your own ID). You will then be asked to upload the ID and confirm its password.
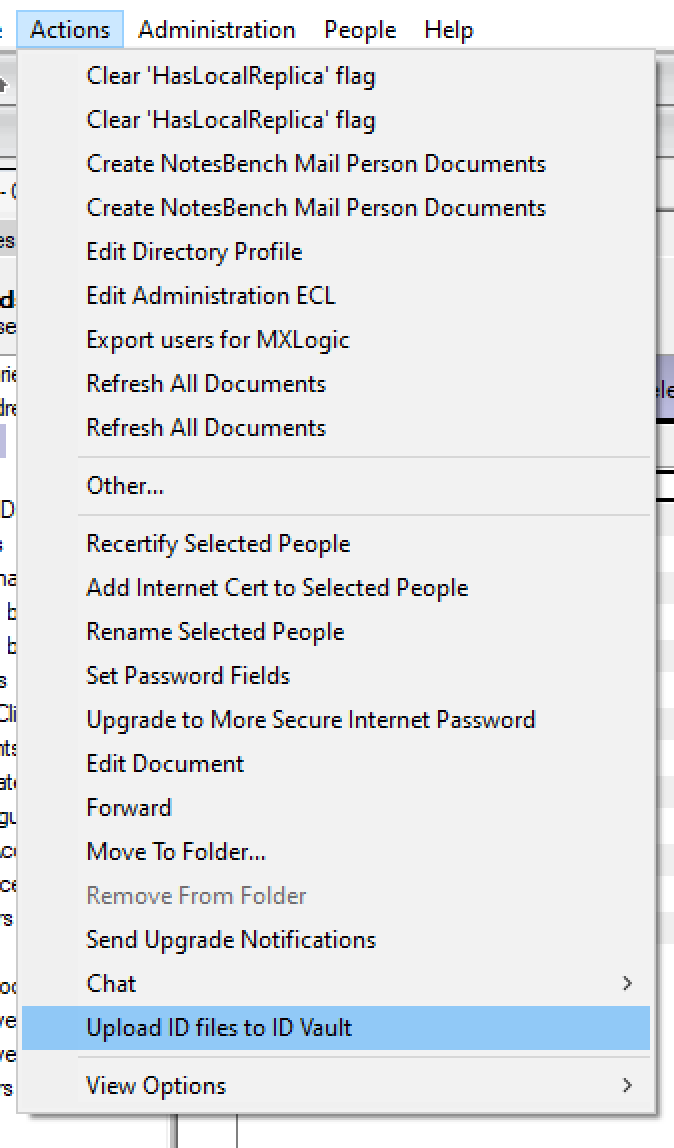
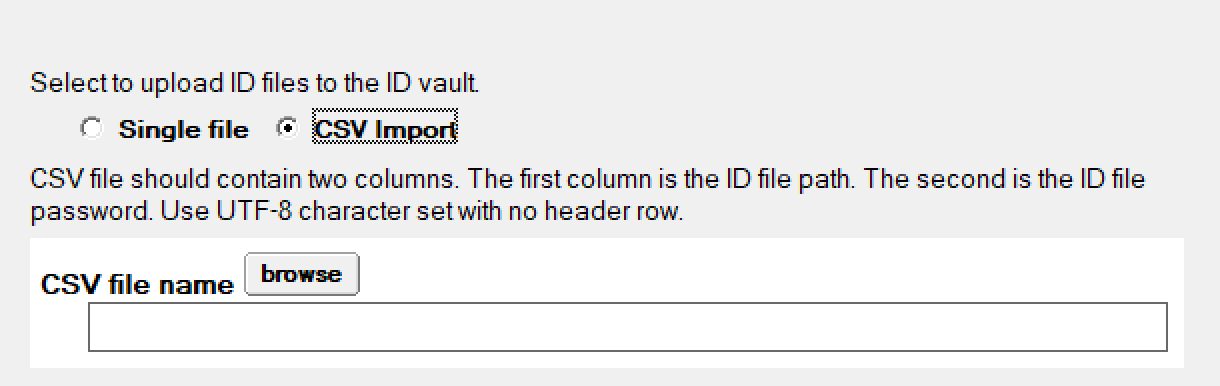
To do an ID update or multiple ID updates as an Administrator go to the People & Groups view in Domino Administrator and selectUpload ID into Vault from the Action menu. Note it is only available via the actions menu and not via right mouse click in the Admin client. You can then choose if you are uploading a single ID or multiple IDs. Since you are supplying the password the Vault will be able to unlock the ID and know what user it belongs to.
If you want to upload multiple IDs then you need to create a 2 column, comma separated CSV file where Column 1 = a path to the Notes ID relative to your client machine Column 2 = the password for each Notes ID
For background, a vault administrator is different from a server administrator and isn’t set by server security but by ID vault security.
New Query Vault Command if you have errors running this command such as “QVR - the local security feature is not supported” see my next blog and verify you have the notes.ini setting IDV_Enable_Vault_Scan = 1
Referenced in detail here but just to highlight two commands I will use a lot
“load qvault -x {vaultname} -u {username} -a (for archive) - this is for if (when) an ID stops syncing into the vault, this command archives the existing vaulted ID and that will tell the Notes client to sync its ID into the vault thinking there isn’t one there alreaady.
“Load qvault -x {vaultname} -u {username} -i OR -v (i for “inactivate” and v for “reactivate” an ID)
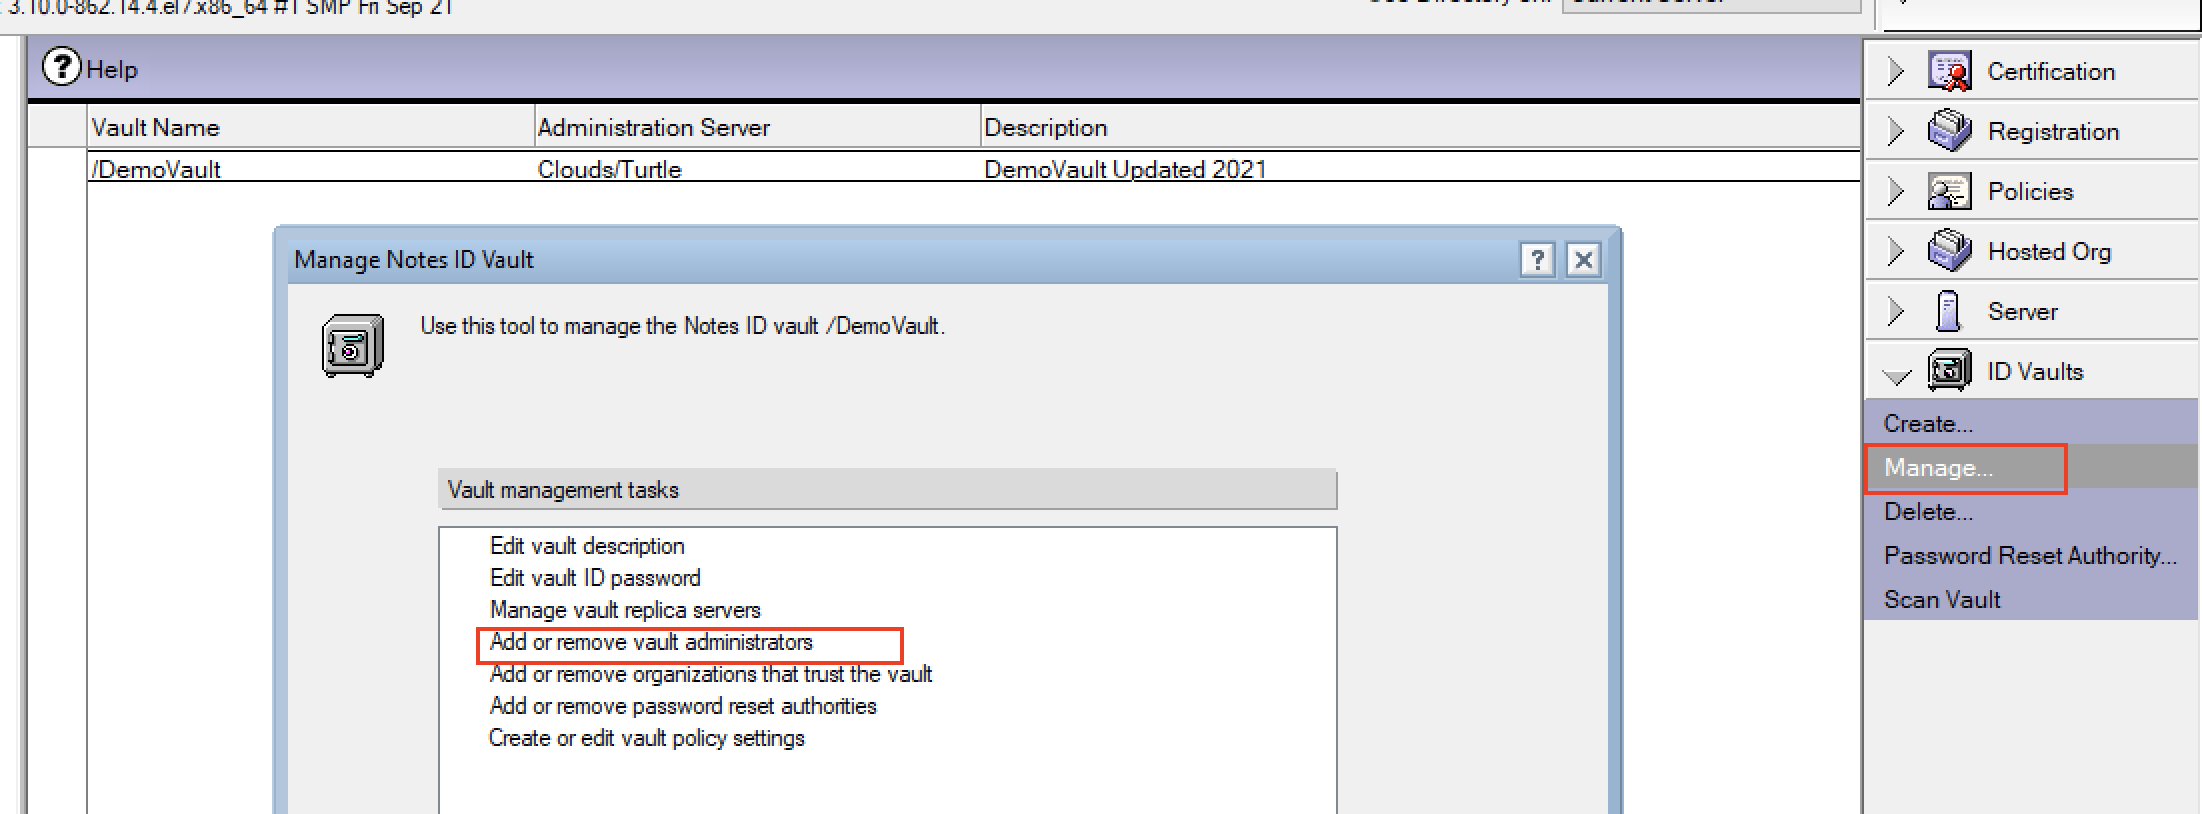
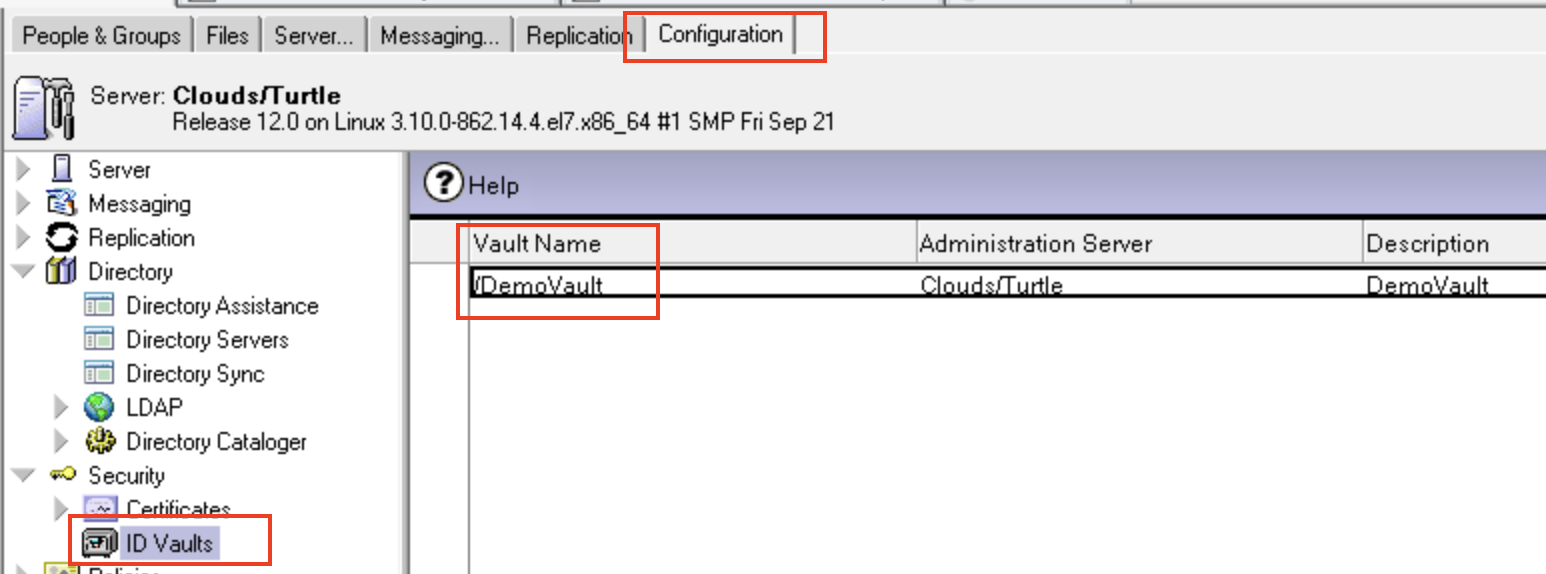
let’s break that down - what is your vaultname? To find that go to Domino Administrator and the “Configuration” tab and then on the left hand side choose ID Vault under Security. Your vault will show in the view to the right and the first column contains the Vault Name. What will display will have a “/” in front of it but in the actual name that is replaced by O= so in the screenshot below my vault name is O=DemoVault.
Of course you can also look at the document properties for the field “VaultName”
What is your username?. That is the canonical format of the first entry in the fullname field of the person document (the static text for that field is “User Name”). So for “Gabriella Davis/Turtle” that would be “CN=Gabriella Davis/O=Turtle” Don’t forget to use quote marks as there are spaces in the user name and the command line on the console won’t like that without quotes around it.
So now we have the command to inactivate user “Graham Hedley” **
or to archive Graham Hedley’s existing vaulted ID so the one being used by his client can be vaulted in its place
load qvault -x O=DemoVault -u “CN=Graham Hedley/O=Turtle” -a
The qvault command is used for maintenance of the ID Vault and can also archive IDs in the vault as well as cleanup already archived IDs. See here for full documentation.
Two new features related to groups I do really like and think I will use a lot.
Find Groups
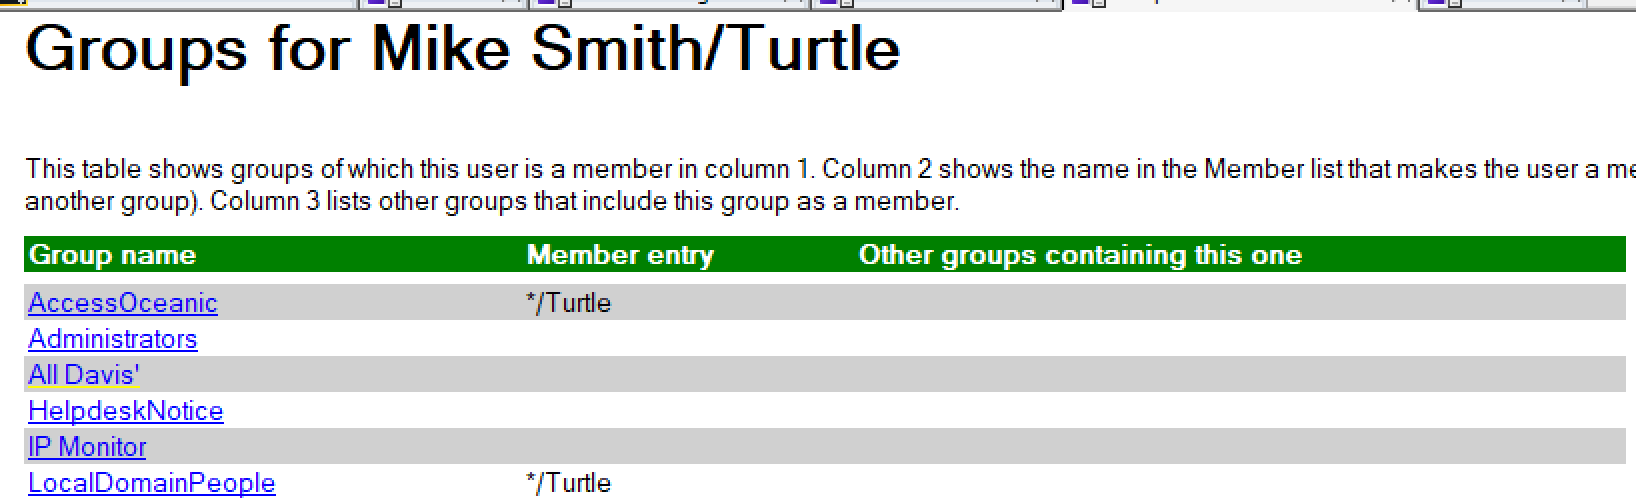
Starting with the simplest - the ability to see what groups a person is in by selecting “Find Groups” from their person document. Yes we have had some of this before in the form of the “Manage Groups” dialog in the People and Groups view but this is more detailed, and most importantly printed on screen.
Open any person document and click “Find Groups”
The system will think for a moment then open up a new page with all of that user’s groups listed in it. The group names in the first column are clickable and will open the group document. The 2nd column shows what entry in the group grants that person access if it’s not their explicit name and the third column will show any nested groups that put them in the named group.
AutoPopulating Groups
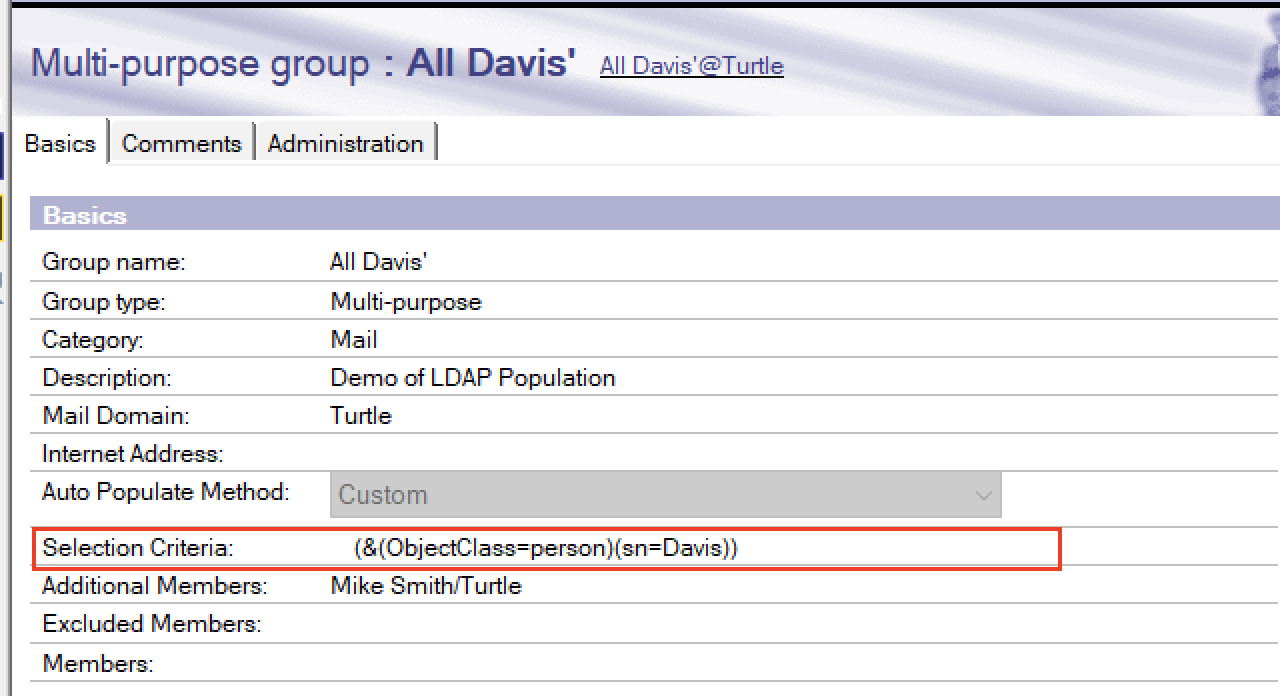
I am betting the new custom autopopulate group feature is going to be heavily used. Certainly by me. We have had the ability to auto populate groups for a while but only by user’s home server never by anything else. Now in v12 we can have groups autopopulate according to any LDAP search we want. For example let’s say I wanted a group that kept itself updated with the names of all people in the Domino Directory having the last name “Davis” (just for giggles). So here I’ve created a group, set it to “Custom” auto populate and written an LDAP syntax that searches for any documents flagged as “person” that also have the last name of “Davis”. We are also able to add other members to the group who otherwise wouldn’t be in there such as Mike Smith and even exclude members.
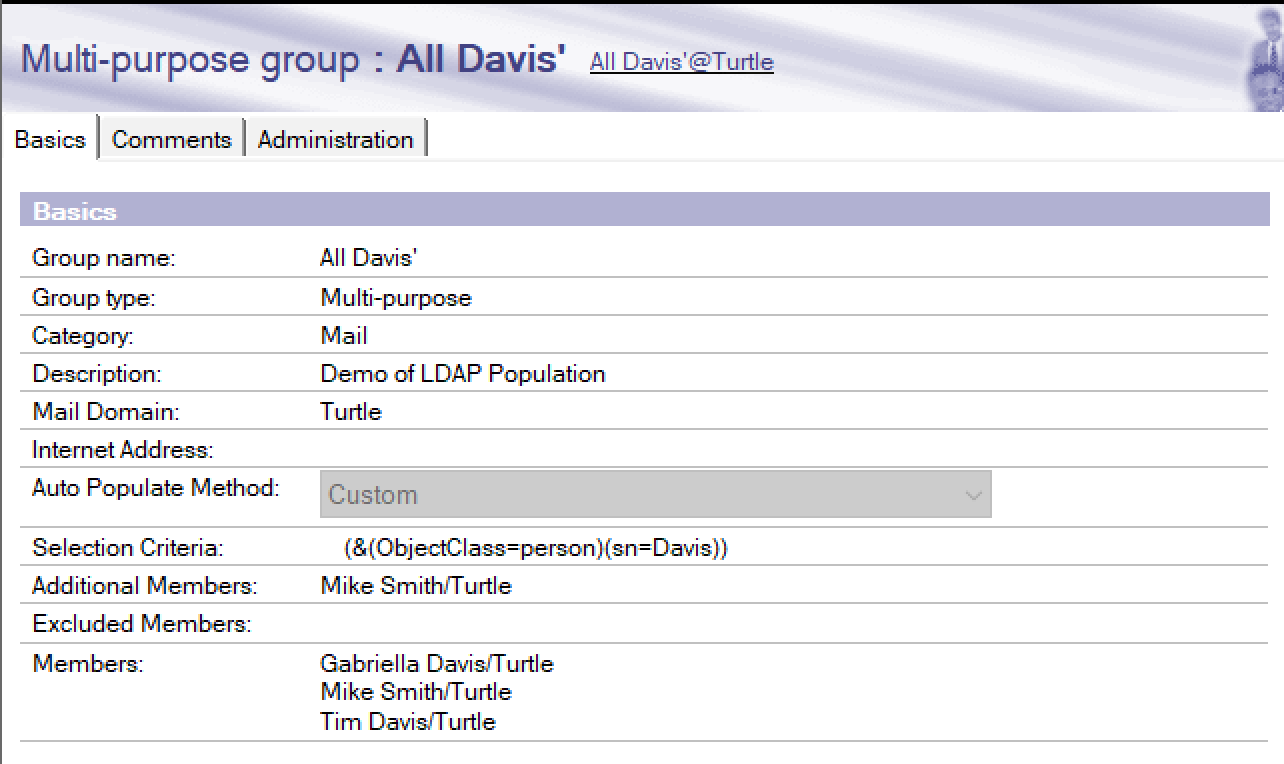
After saving and closing the documents , I checked a few minutes later and my group now shows this, as you can see it has put two Davis’ in the group and added Mike Smith as an additional member. That group membership will continue to be maintained.
You do not need to be running the LDAP task on your server for this to work.
Now think about how useful that is. Groups of people all sharing an internet domain (&(ObjectClass=person)(mail=*.turtleweb.com)) or all at a particular location (&(ObjectClass=person)(Site)). This can be used for any kind of groups including security so if you want to restrict people’s access to an application by their department for instance you can build an autopopulating group that does that.
What if you don’t know how to construct LDAP search syntax? Well it’s not very hard you just need to know some basic rules. When I save the group document it will do a simple LDAP syntax check to make sure your brackets and ampersands look right but you might want to build your search criteria using an LDAP browser yourself first to make sure it’s giving you what you need. I’m a big fan of Softerra’s LDAP Browser which is both brilliant to use and entirely free https://www.ldapadministrator.com/softerra-ldap-browser.htm.
To help you build your syntax it’s good to understand how Domino fields map to LDAP attributes and that is defined in the schema.nsf on your Domino server. The schema.nsf is created or pulled by a server the first time LDAP is run as a task so if your server does not have a schema.nsf just “load ldap” then “tell ldap quit” a few minutes later and one will appear.
For the most part we never touch the schema.nsf but here is an example of its contents that would allow you to see the mappings between fields and attributes.
Lots of great updates for internet security in Domino 12 and for me some of the smallest changes will make the biggest impact to my daily work. For instance, Domino continues to support its proprietary kyr keyfile format but now also supports the PEM format which is commonly used by many web servers.
You can create a PEM file using any text editor and pasting the entire certificate chain into it in the order
Private Key
Server CA certificate
Intermedia certificate
Trusted root or chain certificate
Save the text file with a .pem extension and you’re NEARLY done.
NEARLY - Daniel Nashed has informed me that the process was changed at the last minute for GA and the only way to get the PEM key recognised by Domino is to import it once created using
load certmgr -importpem {filename}
Of course the new approach is to use certmgr for everything from creating the private key and csr through to importing the final PEM and I have another blog ready to go on that as there’s a lot more to certmgr that we need to discuss.
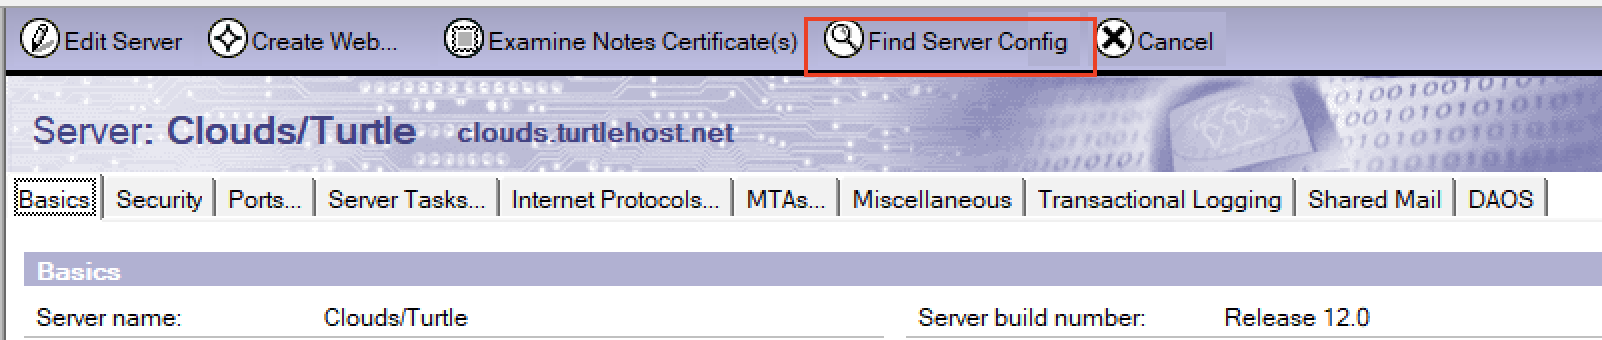
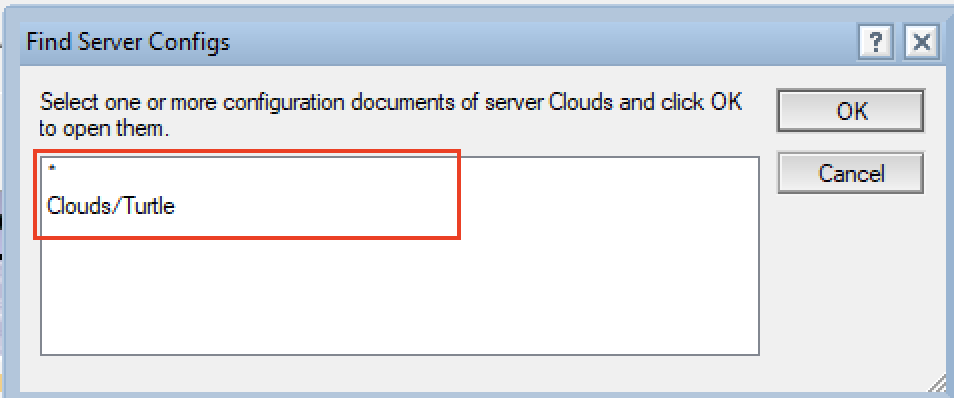
Such a simple thing that will again save me a lot of time. Open your server document and you now have an option to find and view any configuration document that server is assigned to. Click “Find Server Config”
and the dialog box will offer any configuration documents that server is assigned to. In this instance a configuration for Clouds/Turtle specifically as well as the default [All Servers] configuration which is where the LDAP settings are defined.
Several days ahead of schedule and HCL have released FP2 for Notes 11.0.1 providing support for Apple’s latest OSX release, Big Sur.
If you have already upgraded (like me) and discovered your Notes client crashes on launch I recommend you grab this download straightaway. That’s what I am doing.