The IBM Docs Dilemma

IBM Docs is a really nice add on to IBM Connections, what’s more it’s not particularly hard to install.  It does have one requirement, a big one, a show stopping one, a requirement that prevented my customer build from working for about four weeks until IBM and I came up with an agreement for how it could work.  Hopefully this will help you fast forward through that four weeks yourself ..

IBM Docs Infrastructure - The Simple Version

IBM Docs has four component WebSphere servers with applications stored on each

The servers also need access to three data shares; the standard Connections share, a new share for IBM Docs data and a new share for IBM Docs Viewer.  I created the two new shared on the Linux server that currently hosted the CIFS Connections share and installed Samba to enable a Windows server to access them.

I had one problem where it consistently failed during install if I didn’t use capital letters for the mapped drives.  It didn’t refuse to accept lower case letters, it just failed the install.  If your install fails make sure you aren’t using lower case letters.

Challenges

The key requirement for IBM Docs to actually work is that

1. The shares must use mapped drive letters and those drives letters must exist prior to the IBM Docs elements being started

2. The IBM recommendation for achieving this is to create a batch file on the IBM Docs OS (which must be partially if not wholly Windows) to do the drive mapping and have that load in Windows task scheduler on startup.

3. The WAS servers must then be run as services not using a system account but using a named Windows account that matches the one assigned to run the batch file in task scheduler

This solution had two problems, I hated it, and it didn’t work.

I hated this idea because my customer doesn’t run AD at all and their share was a samba share on a Linux box using CIFS.  That means there is no account that can be used to start the services that can also be used to map the drives. There is no easy way to have Windows pass credentials to mount the shares without storing both the name and password that samba recognises in the batch file - like this

net use m: \\hubshared\ibmdocsdata sambapassword /user:sambaaccount
net use n: \\hubshared\ibmdocsview sambapassword /user:sambaaccount
net use l: \\hubshared\conntestshare sambapassword /user:sambaaccount

Unfortunately after several weeks of different ideas from L3 support we admitted defeat to allow me to move on with the install.  I have minimised risk by ensuring the account isn’t a linux account and only has access to the samba shares.

The second part of the solution is the assumption that if you map the drives through task scheduler owned by a Windows user and that same Windows user starts the WAS services - the WAS services will be able to see the mapped drives.  To everyone’s disappointment that absolutely didn’t work because Microsoft kindly mapped the drives from the batch file in a different session to the one where it started the WAS services.  The servers couldn’t see the mapped drives.

So the install was simple but getting everything running securely and without the customer having to manually do anything held us up for weeks.  In the end I opted for a solution where I created a batch file to both map the drives and then start the WAS servers in a scheduled startup script.  That worked beautifully and this is what it looks like

net use m: \\hubshared\ibmdocsdata sambapassword /user:sambaaccount
net use n: \\hubshared\ibmdocsview sambapassword /user:sambaaccount
net use l: \\hubshared\conntestshare sambapassword /user:sambaaccount

Call “c:\IBM\WebSphere\AppServer\profiles\IBMDocs\bin\startnode”
Call “c:\IBM\WebSphere\AppServer\profiles\IBMConversion\bin\startnode”
Call “c:\IBM\WebSphere\AppServer\profiles\IBMViewer\bin\startnode”
Call “c:\IBM\WebSphere\AppServer\profiles\IBMDocsProxy\bin\startnode”

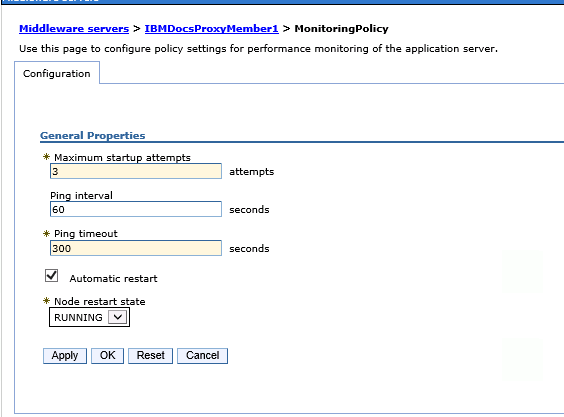
As you can see I only start the nodeagents. The servers themselves and the applications on them are bootstrapped to the start of those. To do that modify the server’s monitoring policy which is found under Java and Process Management for each server

Then set the “Node Restart State” to “RUNNING”

bootstrap nodeagents

My Connections Migration Checklist

I’ve been doing a lot of Connections upgrades and migrations in the past few months and since I prefer to do a side-by-side upgrade there are lots of steps along the way to make sure the data is moved and upgraded from the existing servers to the new servers.  The documentation on how to do this in the Knowledge Center is good but there’s a lot of jumping around all over the place between tasks and I have found it helpful for me to have a checklist to make sure I don’t miss anything.

Here’s the checklist I’m using right now with some explanation and links to the documents in the Knowledge Center for each.  My steps aren’t  in the same order as in the documentation but they are the order I use

In theory the migration shouldn’t make changes to your production servers, but I’m risk averse and it’s worth the extra few minutes to make sure you can back out of the migration should you need to.

Before starting anything you should have created new empty databases on your new system using the scripts / wizard from the version you are moving from.  Even if you are moving to Connections 5 from Connections 4, you will need to use the Database wizard for Connections 4 to create the databases we are going to move data into.   That makes sense when you consider we are going to transfer the data over from the existing production environment so the format / structure and schema must be identical from source to target.

Begin by stopping everything, all WAS servers and DB2 (or SQL, Oracle) in your production environment as well as any TDI assemblylines you may have running.  The data migration requires the production site to be down and stay down until the new site comes up, that could be anywhere from a day to 3 days depending on how big your environment is and how much data you have as well as the connectivity between old and new environments when transferring the data.

Now let’s back everything up - just get the existing production configuration data somewhere you can access it and make sure you don’t lose any data during migration so backup all the DB2 databases as well as the Connections shared data /Connections/data.. /shared (I personally like to backup /Connections/data which gets local as well but that’s just me.

  • Backup Connections Dmgr Profile by running backupconfig.bat /.sh from the /Dmgr01/bin directory.  This will stop the Dmgr server if it’s not already stopped or if you don’t use the -NoStop parameter. (no need to backup Installation Manager when doing a side by side migration)
  • Backup the Connections shared data
  • Backup customisations somewhere you can access them for reading and manual copying over to the new environment
  • Run the migration.bat / sh to export the Connections configuration data ready for import in your new environment.  This includes the LotusConnections-Config.xml and application specific data.  This is exported to a directory you then copy to your new environment where you can import it
  • Migrate each of the databases, one at a time.  Each one has a pre-script to run to prepare the database, then at least 2 migration scripts, one to move the data and one to clear the scheduler entries on each database.   All the instructions are here however there are a couple of things to bear in mind.

When running the scripts I like to add >filename to the end of each command to pipe the output to a log file.  I usually create a “Logs” directory and call the file by the name of the script _app name e.g predb_blogs.txt.  This way I can check if the scripts ran OK by reading the logs and I have something to send to IBM if it comes down to opening a PMR

See my earlier blog for potential syntax issues running the scripts

To run dbt.jar which migrates the data you create an XML file and a matching Batch file for each application.  I like to create all of these at once and add them to a directory from which I can run for each application (again with the >logfile at the end).  Below are examples of XML and batch files I modify to use (I’ve avoided putting in carriage returns as that messes things up should you copy out of here)

XML (e.g. files.xml below)
<dbTransfer xmlns:xsi=”http://www.w3.org/2001/XMLSchema-instance“><database role=”source” driver=”com.ibm.db2.jcc.DB2Driver” url=“jdbc:db2://sourcedbserverhost:50000/FILES” userId=“db2admin” schema=“FILES” dbType=“DB2”/> <database role=”target” driver=”com.ibm.db2.jcc.DB2Driver” url=”jdbc:db2://targetdbserverhost:50000/FILES” userId=“db2admin” schema=“FILES dbType=“DB2”/> </dbTransfer>

BATCH (calls files.xml)
“e:\install\connections\wizards\jvm\win\jre\bin\java” -cp e:\dbt_home\dbt.jar;e:\ibm\sqllib\java\db2jcc.jar;e:\ibm\sqllib\java\db2jcc_license_cu.jar com.ibm.wps.config.db.transfer.CmdLineTransfer -logDir e:\dbt_home\logs -xmlfile e:\dbt_home\files.xml -sourcepassword typedb2passwordhere -targetpassword typedb2passwordhere

  • Upgrade database schemas.  Once all the migrations scripts have been run (don’t forget the clearScheduler and run/updateStats where needed) you can proceed to upgrade the databases.  I like to back them up one more time before running the upgrade though, but that’s just me.  If it took a day or more to migrate the data I don’t want to do that all again.There are two ways to update the databases on your new target server.  Either using the provided (Connections 5) database wizard and choosing “Upgrade” or by running manual scripts.  I prefer to run the scripts manually so I can see what’s going on and IBM recommend that for the Homepage at least you run the script manually rather than use the Wizard.

    Instructions for doing both Wizard and Manual methods are here .  The biggest issue with running the scripts manually is that there are slightly different syntaxes depending on which version you are coming from and it’s fiddly getting the right one, I still prefer it although  I have used the Wizard for several of the applications and it has worked fine.

  • Once you’ve upgraded all the databases, the Homepage requires another step and that’s to do a java migration of its data. This ensures the format and content of each individual’s homepage matches that required for Connections 5.  The Homepage database is by far the largest of all those used and this could take significant time.  Below is an example of the command I run (again I have taken out carriage returns and invalid quotes etc

e:\install\connections\wizards\jvm\win\jre\bin\java -Dfile.encoding=UTF-8 -Xmx1024m -classpath e:\ibm\sqllib\java\db2jcc.jar;e:\ibm\sqllib\java\db2jcc_license_cu.jar;e:\install\connections\wizards\lib\lic.dbmigration.default.jar;e:\install\connections\wizards\lib\commons-logging-1.0.4.jar;e:\install\connections\wizards\lib\news.common.jar;e:\install\connections\wizards\lib\news.migrate.jar com.ibm.lconn.news.migration.next50.NewsMigrationFrom45to50 -dbur1 jdbc://db2://targetdb2hostname:50000/HOMEPAGE -dbuser db2admin -dbpassword targetdb2password >java.out.log 2>&1

  • Importing artifacts.  Using the directory and contents created earlier one when we exported the Connections artifacts, we can now import them into our new Connections environment.  We’re basically doing the reverse of what we did to export but this time running migration.bat /sh lc-import.
  • CommunitiesMemberService.syncMemberExtIdByLogin(“wasadmin”)
  • Migrate or Rebuild the search index.  Migrating can be done if the source version is 4.5 because the search index structure is the same however I prefer to rebuild cleanly if I have the time
  • FilesDataIntegrityService.syncAllCommunityShares()
  • Custom profiles. If you have custom profile settings (strings, languages, profile types) in your existing environment and that is 4.0 these will need to be migrated / converted to the Connections 5 format.  There are also settings that should have come over when restoring your artifacts that it is worth validating

The items below tend to be optional depending on what is installed in your current environment but if these elements exist currently they will need to be migrated too

Cognos

Connections Content Manager

Media Gallery

That’s my list anyway.  Obviously the Knowledge Center is the definitive source for all you installation / documentation needs 🙂