The Sametime Proxy Server is needed if you have a Community server you want people to login to using either a web or mobile client, this includes having Sametime awareness for other products such as Verse or Connections. Since I had already installed a Community Server without using a System Console I now wanted to add a Sametime Proxy Server with as minimal additional software as possible.
The Sametime Proxy server uses a DB2 database for iOS push notifications. If you don’t create that database the server will work in every other way but you won’t have working push notifications to iOS devices. You can create the database on any DB2 10.x or 11.x server but if you don’t have DB2 your Sametime license includes entitlement to a limited for Sametime only use license of DB2 10.5 (at least that’s what is in the download).
To start we need to install Installation Manager. Installation Manager is a package management software that will be used to install WebSphere and the Sametime Proxy Server on top of it. The Sametime download comes with version 1.6.2 but you are going to want to upgrade that to at least 1.8.6 before installing anything. Once Installation Manager is installed we need to install WebSphere 8.5.5 fixpack 14. Don’t worry about the fixpack download for now, if you have internet access during the install that can be done automatically so you will want to start by extracting each of the three WebSphere installers to a directory on your file system. It doesn’t matter which one. I extracted mine to C:\Software\WAS855. This is just the install directory so you don’t need to keep it once the install is complete.
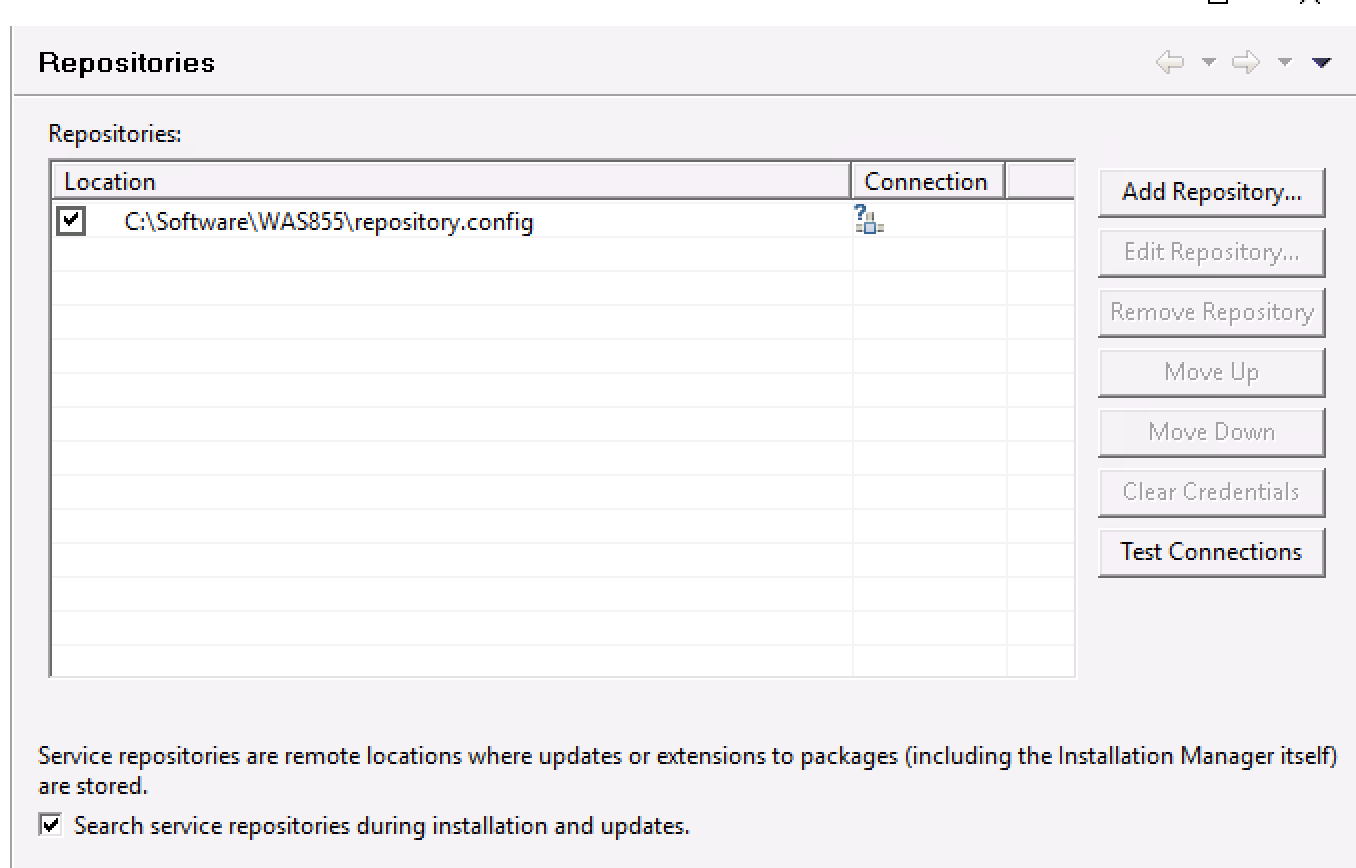
Now we need to add a repository under Installation Manager so it can find the installer for WebSphere. The installer file is always repository.config so I added a respository (File - Preferences) and pointed to c:\software\was855\repository.config
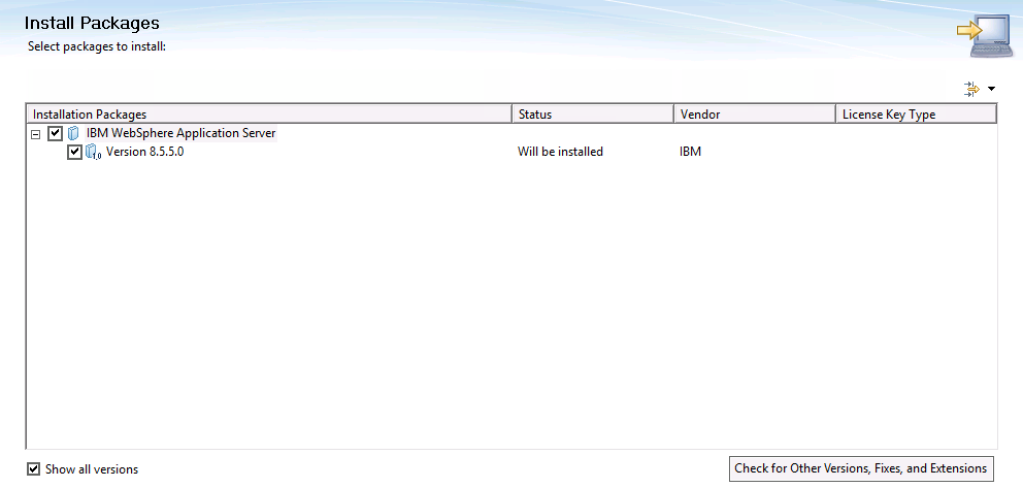
Once the repository is added I can choose “Install” from the main Installation Manager menu and I will be presented with the option to install WebSphere 8.5.5. As you can see it has automatically checked Version 8.5.5.0 and I have checked “Show all versions” so I can install Fixpack 14 directly during this one install step.
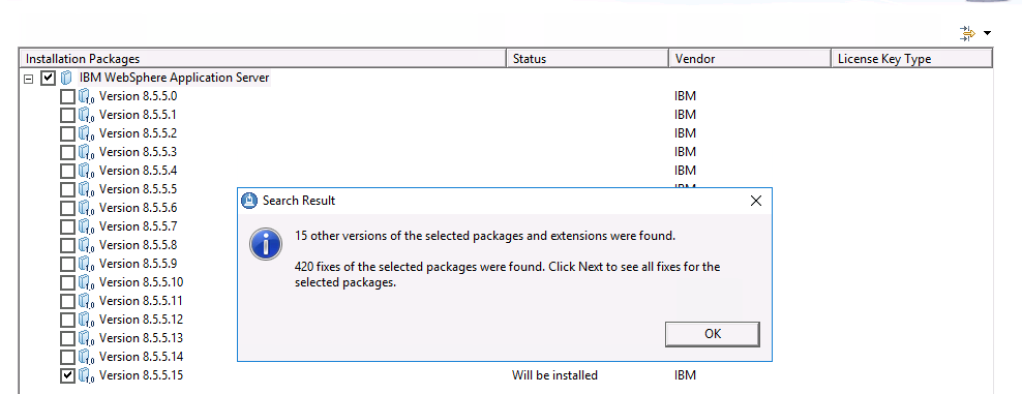
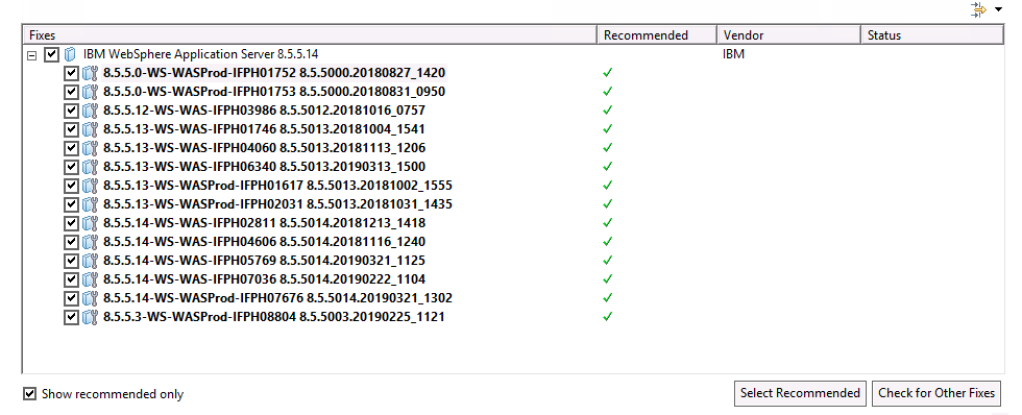

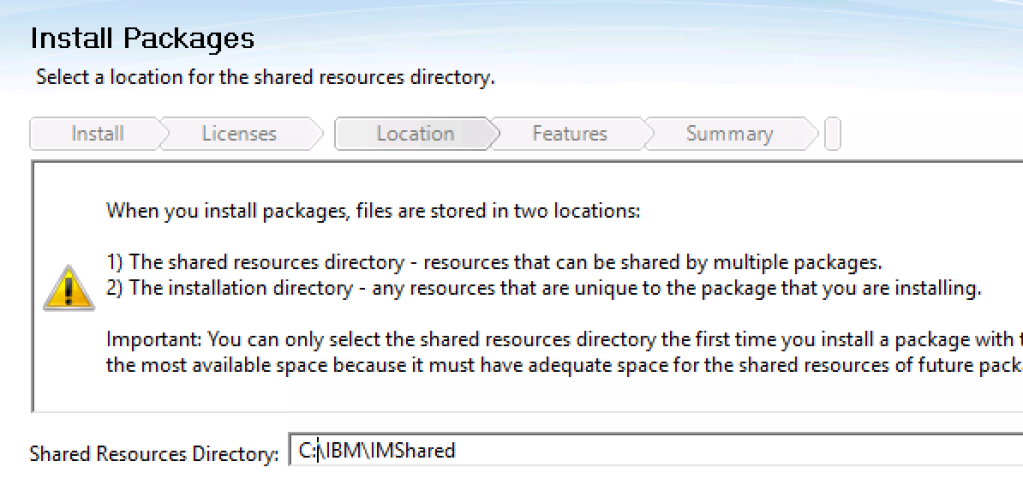
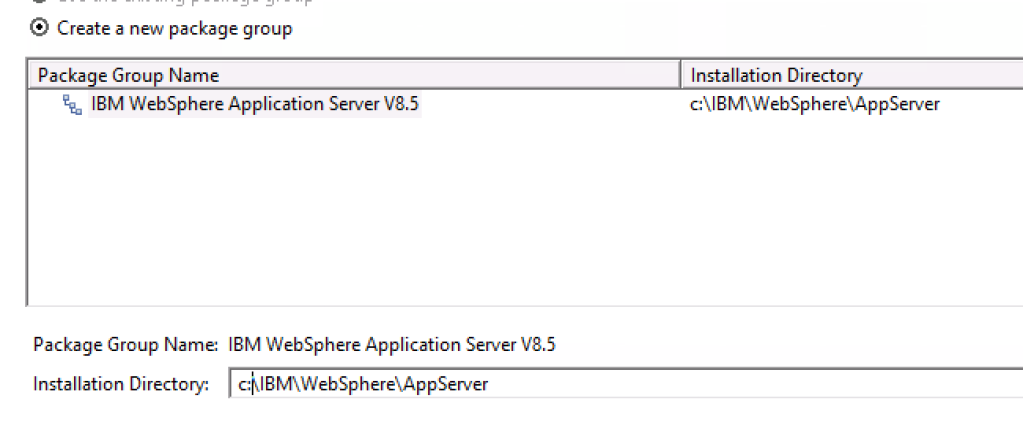
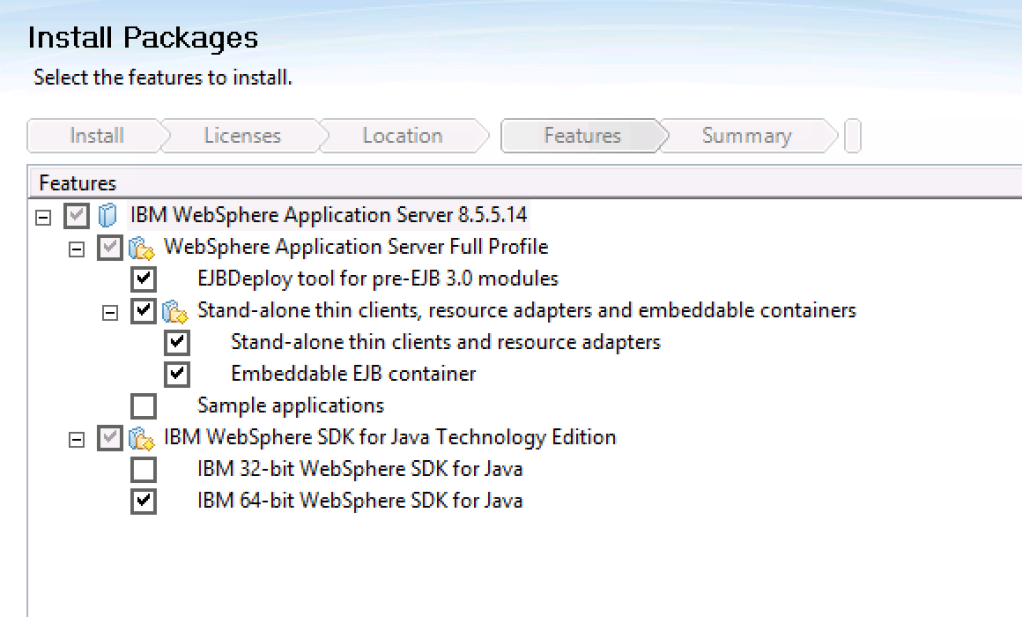
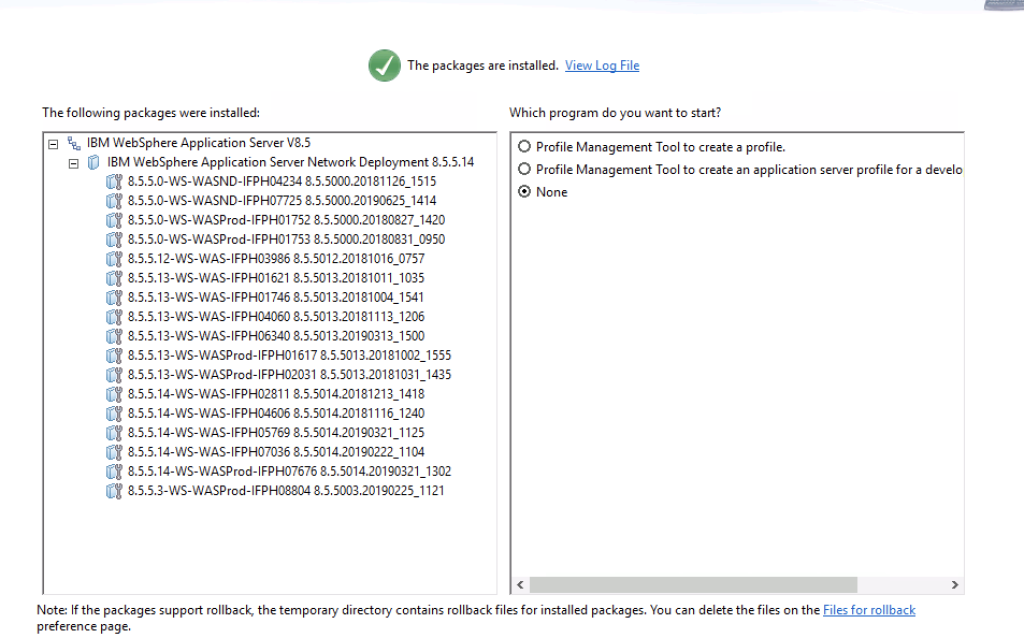
Now the WebSphere install is complete we can proceed to installing the Sametime Proxy Server. In my design it’s a standalone server so has no deployment manager or System Console. The instructions to do this require us to perform a silent install which means using a response file specifying the configuration that is accessed from outside the Installation Manager GUI.
The extracted installer for the Sametime Proxy Server contains a response file we can edit for our own install. My response file was in
C:\Software\SametimeProxyServer\responseFiles and was called ip.rsp.
I took a copy of that file and made my own changes - see the bottom of this blog for my ip.rsp file but one very important consideration is that in the sample ip.rsp the default password of “wasadmin” is set. If you run the install without changing that you will end up with a login of wasadmin and a password of wasadmin.
The lines in the rsp file that set this are
<data key=’user.com.ibm.lotus.sametime.proxyserver.was.adminid’ value=’wasadmin‘/>
<data key=’user.com.ibm.lotus.sametime.proxyserver.was.password’ value=’zN39fpCc9SqIryGJM7+02A==‘/>
zN39fpCc9SqIryGJM7+02A== is the encoded value of “wasadmin”, you must enter the encoded value of the password you want to set in the response file. To generate the encoded value before adding it to the response file you use the “generateEncodedPassword” utility which can be found in your Sametime Proxy Server extracted install e.g.
c:\Software\SametimeProxyServer\GenerateEncodedPassword\
From the IBM Installaton Manager install directory (C:\IBM\Installation Manager for me) I ran
C:\Software\SametimeProxyServer\GeneratedEncodedPassword\GenerateEncodedPassword.bat gabpass >pw.txt - which generates the encoded value for “gabpass” and writes it to the pw.txt text file as “rNFGfQ/sPi082+AaXFMNxA==. I write the value to a text file so I can have it recorded whilst I complete the next step.
I can then modify the value of <data key=’user.com.ibm.lotus.sametime.proxyserver.was.password’ value=’rNFGfQ/sPi082+AaXFMNxA==’/>
Important note; do not try and use special characters in your WebSphere passwords especially @ and !.
Now we are ready to run the silent install from the eclipse directory where Installation Manager is installed e.g c:\IBM\Installation Manager\eclipse using the command
IBMIMc -launcher.ini silent-install.ini -input response_file -log log_path_and_filename -acceptLicense
See output of my install running below
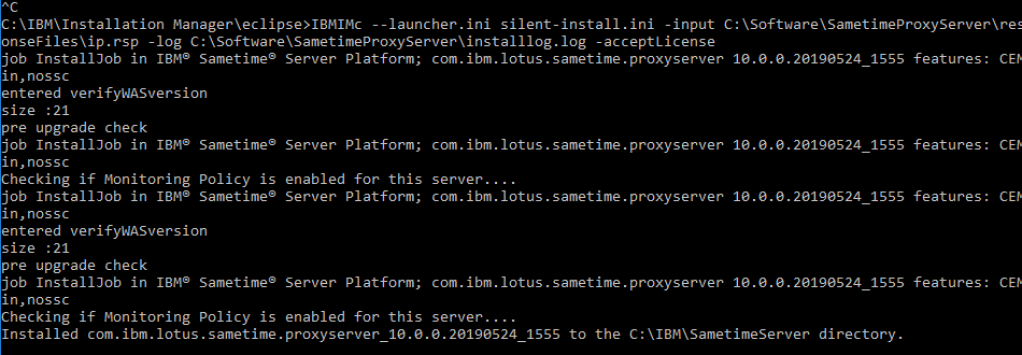
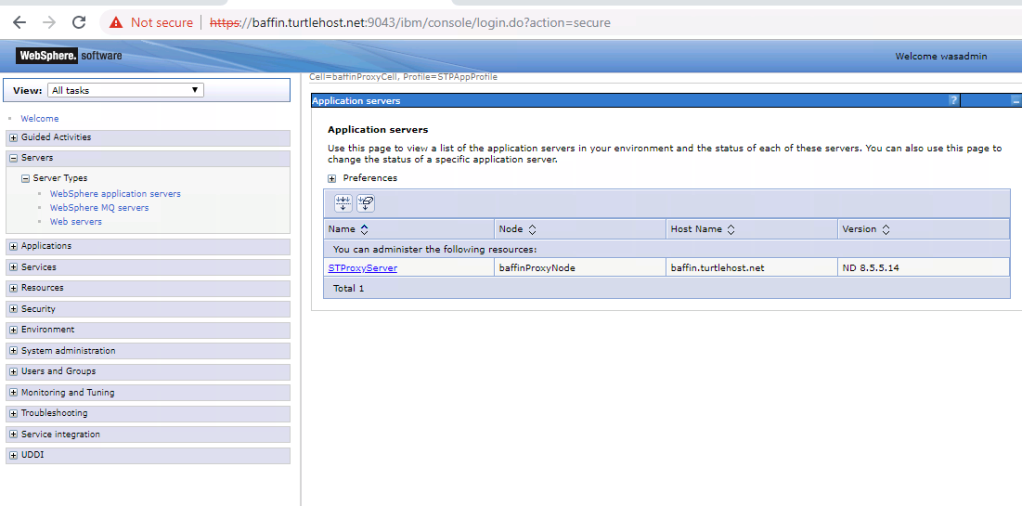
With the install completed successfully we can sign onto the node via https://hostname:9043/ibm/console using the credentials we set in our rsp install file and see the Sametime Proxy Server in place. The community server that the Sametime Proxy connects to was specified in my response file when I did the install.
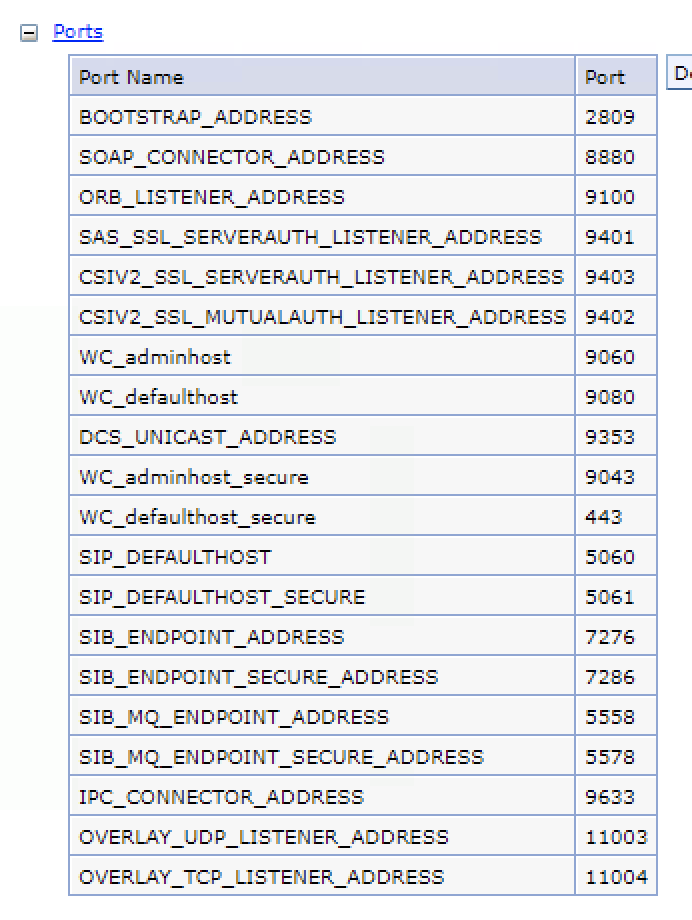
In my environment I wanted to have the Sametime Proxy Server on port 443 securely and to install my own SSL certificate. To modify the ports for the Samtime Proxy Server click on the server name and choose “ports” under “Communication” then edit the value for “wc_defaulthost_secure”.
Once this step is complete you should be able to connect to Sametime through a mobile client or through the web using the new web client on https://hostname:port/chat
Once the server is installed any changes to the configuration such as which Community server or cluster it should connect to should be changed by directly editing the stproxyconfig.xml file.
I could do that but then I hit a problem in that anyone accessing Sametime via the Proxy Server could send but not receive messages or see any they sent. My next blog “Issues With MongoDB During Sametime Install” explains what happened and how HCL helped me identify and fix it.
For the official install instructions from HCL please see this PDF
My ip.rsp file is shown below as an example. You will need to modify it for your own install.
<?xml version="1.0" encoding="UTF-8"?>


<!--The "acceptLicense" attribute has been deprecated. Use "-acceptLicense" command line option to accept license agreements.-->

<agent-input temporary='true' clean='true'  acceptLicense='false'>


<server>

<!-- When the repository location is specified as a relative path, the path is interpreted relative to the location of this response file -->

<repository id='IBM® Sametime® Server Platform'>

<!--

The files which are installed in the directory specified by the value of the

user.installlocation relate to WAS installer code.

If the specified directory exists prior to running the installer it must be empty.

Therefore, if you are installing upon an existing copy of WebSphere,

you will probably need to change it from the default value.

-->

<data key='user.installlocation' value='C:/IBM/SametimeServer'/>
<!-- This attribute specifies where WebSphere Application Server is already installed. -->

<data key='user.was.installlocation'value='C:/IBM/WebSphere/AppServer'/>

<!--

This location is the path we will install the offering to i.e. the files used for creating

Sametime WAS server profiles.

-->

<data key='user.com.ibm.lotus.sametime.proxyserver.offering.installlocation' value='C:/IBM/WebSphere/STPServerCell'/>

<!--

*** CHANGEME ***

The following two XML elements specify the host and port of the Sametime community server that

you wish to connect to with this Proxy server. You will need to alter it. The host name needs to be the FQDN of the CS
The default port to use is 1516, because this is the default port for Virtual Places

server to server communication (1533 is the default for client to server communication_

-->

<data key='user.com.ibm.lotus.sametime.proxyserver.sthostname' value=‘stsite.turtlepartnership.com’/>

<data key='user.com.ibm.lotus.sametime.proxyserver.stport' value='1516'/>

<!--

This attribute defines the type of WAS profile(s) you wish to create.

This attribute is case-sensitive and Valid options are:

'Cell' - (default) create a cell consisting of a Deployment manager and a managed node

'PN' - create a stand-alone primary node  federated to an existing SSC Deployment manager

'SN' - create a secondary node federated to an existing Deployment manager

-->

<data key='user.com.ibm.lotus.sametime.proxyserver.installtype' value='PN'/>
<!--

If you specified that you wish to install a WAS secondary node profile,

you must edit these attributes to match the host name and soap port of the Deployment manager you wish to have your WAS profile managed by
If this secondary node is a standalone node, then edit these attributes to match the secondary node's hostname and soap port values.

-->

<data key='user.com.ibm.lotus.sametime.proxyserver.dmhost' value='DMHost'/>

<data key="user.com.ibm.lotus.sametime.proxyserver.Dmgr.WASDMSoapPort" value="8603"/>

<data key="user.com.ibm.lotus.sametime.proxyserver.Dmgr.WASHost" value="DMHost"/>
<!--

Uncomment this attribute if you wish the WAS profile to use a hostname other than the default for this machine

if you do specify a hostname it should be the fully qualified domain name (e.g. "servername.domain.com" not "servername")
<data key='user.com.ibm.lotus.sametime.proxyserver.hostname' value='HOSTNAME'/>

-->

<!--

The WAS profiles created by the installer will be protected by File based security

for the System Console. The following two XML elements specify the username & password

that can be used to login to the WAS System Console.It is not allowed to omit these elements.

For security reasons you do not store the password in plain text. Instead you can use

the generateEncodedPassword utility contained in the kit to generated an encoded form of the password

For example 'zN39fpCc9SqIryGJM7+02A==' is equivalent to a password of 'wasadmin'
It is not possible to choose LDAP security during install, but this can be

configured after install

-->

<data key='user.com.ibm.lotus.sametime.proxyserver.was.adminid' value='wasadmin'/>

<data key='user.com.ibm.lotus.sametime.proxyserver.was.password' value='zN39fpCc9SqIryGJM7+02A=='/>

<!--

The default is to name the WAS cell <HOSTSHORTNAME>ProxyCell

and to name the WAS node <HOSTSHORTNAME>ProxyNode

but you can over-ride the defaults by un-commenting the following parameters
<data key='user.com.ibm.lotus.sametime.proxyserver.cellname' value='HOSTNAMEProxyCell'/>

<data key='user.com.ibm.lotus.sametime.proxyserver.nodename' value='HOSTNAMEProxyNode'/>

-->
<!--

These are the names that will be assigned to the WAS profiles created by this installer

It is safe to simply use the default values or to change them to anything you want so long as the profile names are unique

 -->

<data key='user.com.ibm.lotus.sametime.proxyserver.was.serverprofile' value='STPAppProfile'/>

<data key='user.com.ibm.lotus.sametime.proxyserver.was.dmprofile' value='STPDMgrProfile'/>

<data key='user.com.ibm.lotus.sametime.proxyserver.was.snserverprofile' value='STPSNAppProfile'/>

<data key='user.com.ibm.lotus.sametime.proxyserver.was.appserver' value='STProxyServer'/>

<!--Port the Deployment Manager will run on. This should not be changed from the default of 8600 -->

<data key='user.com.ibm.lotus.sametime.proxyserver.was.dmport' value='8600'/>

<!--Port the Deployment Manager will use for SOAP connections (the default is 8603) -->

<data key='user.com.ibm.lotus.sametime.proxyserver.was.dm.soapport' value='8603'/>

<!--

This attribute specifies whether or not you wish to install from a SSC deployment plan

It is case-sensitive and the only valid values are TRUE and FALSE
If you change this to TRUE, you will also need to specify values for

user.com.ibm.lotus.sametime.proxyserver.SSChostname, user.com.ibm.lotus.sametime.proxyserver.SSCportnumber,

user.com.ibm.lotus.sametime.proxyserver.SSCusername, user.com.ibm.lotus.sametime.proxyserver.SSCpassword and

user.com.ibm.lotus.sametime.proxyserver.SSC_SSLEnabled

see the other sample response file for sample values for these parameters

-->

<data key='user.com.ibm.lotus.sametime.proxyserver.SSCEnabled' value='FALSE'/>
<!--

This attribute specified is we are doing an upgrade or a fresh install

It is case-sensitive and valid values are 'INSTALL' or 'UPDATE'.

-->

<data key='user.com.ibm.lotus.sametime.proxyserver.job' value='INSTALL'/>
<!-- version of Sametime to install, 10.0.0.0 -->

<data key='user.com.ibm.lotus.sametime.proxyserver.offVersion' value='10.0.0.0'/>
<!--

This attribute specifies if the Proxy server will co-exist with a SCC server

Set this value to TRUE if SSC is installed on same machine as Proxy Server

  It is case-sensitive and the only valid values are TRUE and FALSE

-->

<data key='user.com.ibm.lotus.sametime.proxyserver.ssc.coexist' value='FALSE'/>
<!--

On non-windows platforms this attribute should point to a temporary directory that

can be used for storage of files used by the installer. I needs to be on a disk with

greater than 1GB of free space

-->

<data key='user.nonWin.temp' value='C:/IBM/WebSphere/STtemp'/>
<!--

This is the Language code for the language version you wish to install

e.g. de for German, zh for Simplified Chinese

-->

<data key='cic.selector.nl' value='en'/>
<!--

    These parameters specifies database credentials and hostname. Get the encoded DB password using the generateEncodedPassword utility

available in the download package. The default port for DB2 is 50000.

-->

<data key='user.com.ibm.lotus.sametime.proxyserver.dbport' value='50000'/>

<data key='user.com.ibm.lotus.sametime.proxyserver.dbhostname' value='@@DBHOST@@'/>

<data key='user.com.ibm.lotus.sametime.proxyserver.dbname' value='@@DBNAME@@'/>

<data key='user.com.ibm.lotus.sametime.proxyserver.dbuser' value='@@DBUSER@@'/>

<data key='user.com.ibm.lotus.sametime.proxyserver.dbpass' value='@@ENCODEDDBPASSWORD@@'/>

</profile>
<install modify='false'>

<!--

The features parameter of the offering element identifies what features are to be installed.

If installing with SSC, it should be set to 'CEMain,nossc,ssc'

If installing without SSC, it should be set to 'CEMain,nossc'

The id parameter should not be altered of the installer won't work

In the profile name the ® character is represented by ®

This representation is safer if the file is edited with a tool which does not support Unicode properly

-->

<offering profile='IBM® Sametime® Server Platform' features='CEMain,nossc' id='com.ibm.lotus.sametime.proxyserver'/>

</install>
<!--

This next parameter specifies the location of the temporary cache where

Installation Manager stores files during install e.g. C:/Program Files/IBM/IMShared

-->

<preference value='C:/IBM/IMShared' name='com.ibm.cic.common.core.preferences.eclipseCache'/>

<!--

This parameter specifies whether or not the installer should search for possible updates on the web at ibm.com

Since Sametime does not maintain a fix repository on the web this should always be set to false because if there is no

connection to the Internet and it is set to true users may get error messages when it looks for the repository

(and the repository will not contain fixes anyway)

-->

<preference value='false' name='offering.service.repositories.areUsed'/>

</agent-input>
Hello. chat is working fine but i cant see what i sent. just a white space
Can you get replies? Have you checked the schema version set on Mongo and also my latest blog about Mongo problems?
I am already at home so i can’t check it anymore. yes i also see your latest blog regarding on the auto start on the mongo db but i think that was not the cause on my concern. also how to check the features(server logging?) does it saved to the database directly on the mongo db datbase? i opened up the mongo db client(mongo compass) but it can’t see any document while opening the database(chatlogging). THank you for the reply. appreciate it very much and keep blogging.
btw thank you for the nice and cool blogs. keep it up. i will wait for your next blog regarding on this fix. maybe i think it has something to do with the response file configuration(IP.rsp)
Hi Gabriella, thanks for this awesome instruction. Did you know If there are problem to install an additional sametime server? Our current Sametime server (8.5.1 Limited Use) running several years and I want to install a additional Sametime V10 limited Use Server on a new windows server. We want to add this server to our production domain. Do you know any problems yet?
You could install the Community server and should have no issues. If however you have a 8.5.1 Sametime System Console you won’t be able to add it to that yet.